
Page 374 - Divyank Tyagi
P. 374
340 | ChApter 9 ConCeptual Design anD Design analysis
energy Analysis Setup
Before you can run an analysis for either building elements or massing, you need to do a bit of
configuration to give your analysis engine some parameters to run. You’re going to use the mass
you created, but you’re going to insert that mass into an existing building model so you can run
the analysis side by side. Let’s get started by comparing the two buildings (existing and mass)
side by side.
Open the c09-Analysis-Start.rvt or c09-Analysis-Start-Metric.rvt file.
You can download the file from the book’s companion website, www.sybex.com/go/
MasteringRevit2015. Once the file is open, activate the Level 1 floor plan, and then load and
insert the mass you made earlier in this chapter. You can also download the completed massing
family from the website (c09-Conceptual-Mass-Finished.rfa). Position the mass in the center
of the plan view.
To begin the configuration of the energy analysis settings, follow these steps:
1. Activate the default 3D view, and in the view control bar, set the Visual Style to Shaded
and turn Shadows on. Select the massing form, and from the Properties palette click
Edit Type. Uncheck the box in the property named Show Rig and then click Apply. This
will turn off the generic model faces from the adaptive component you used to build the
massing form.
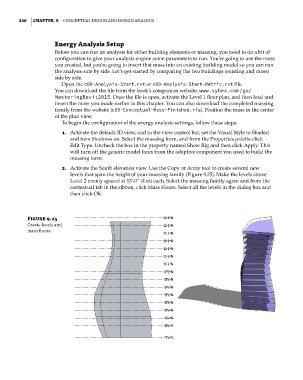
2. Activate the South elevation view. Use the Copy or Array tool to create several new
levels that span the height of your massing family (Figure 9.25). Make the levels above
Level 2 evenly spaced at 13’-0” (4 m) each. Select the massing family again and from the
contextual tab in the ribbon, click Mass Floors. Select all the levels in the dialog box and
then click OK.
Figure 9.25
Create levels and
mass floors.
c09.indd 340 5/3/2014 11:01:07 AM