
Page 888 - Divyank Tyagi
P. 888
854 | ChAPteR 21 Working With Point Clouds
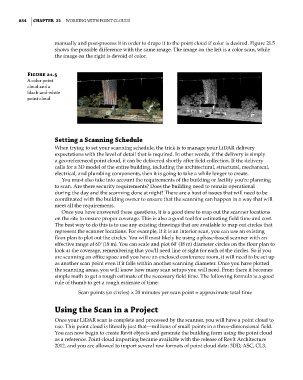
manually and post-process it in order to drape it to the point cloud if color is desired. Figure 21.5
shows the possible difference with the same image. The image on the left is a color scan, while
the image on the right is devoid of color.
Figure 21.5
a color point
cloud and a
black-and-white
point cloud
Setting a Scanning Schedule
When trying to set your scanning schedule, the trick is to manage your LiDAR delivery
expectations with the level of detail that is required. In other words, if the delivery is simply
a geo-referenced point cloud, it can be delivered shortly after field collection. If the delivery
calls for a 3D model of the entire building, including the architectural, structural, mechanical,
electrical, and plumbing components, then it is going to take a while longer to create.
You must also take into account the requirements of the building or facility you’re planning
to scan. Are there security requirements? Does the building need to remain operational
during the day and the scanning done at night? There are a host of issues that will need to be
coordinated with the building owner to ensure that the scanning can happen in a way that will
meet all the requirements.
Once you have answered these questions, it is a good time to map out the scanner locations
on the site to ensure proper coverage. This is also a good tool for estimating field time and cost.
The best way to do this is to use any existing drawings that are available to map out circles that
represent the scanner locations. For example, if it is an interior scan, you can use an existing
floor plan to plot out the circles. You will most likely be using a phase-based scanner with an
effective range of 60ʹ (18 m). You can scale and plot 60ʹ (18 m) diameter circles on the floor plan to
look at the coverage, remembering that you’ll need line of sight for each of the circles. So if you
are scanning an office space and you have an enclosed conference room, it will need to be set up
as another scan point even if it falls within another scanning diameter. Once you have plotted
the scanning areas, you will know how many scan setups you will need. From there it becomes
simple math to get a rough estimate of the necessary field time. The following formula is a good
rule of thumb to get a rough estimate of time:
Scan points (or circles) × 20 minutes per scan point = approximate total time
Using the Scan in a Project
Once your LiDAR scan is complete and processed by the scanner, you will have a point cloud to
use. This point cloud is literally just that—millions of small points in a three-dimensional field.
You can now begin to create Revit objects and generate the building form using the point cloud
as a reference. Point cloud importing became available with the release of Revit Architecture
2012, and you are allowed to import several raw formats of point cloud data: 3DD, ASC, CL3,
c21.indd 854 5/3/2014 12:05:44 PM