
Page 13 - DP Vol 20 No 5_Neat
P. 13
particle abrasion is performed using 25-micron aluminum oxide finger to prevent movement during the wedge placement. A Strata
powder. This process cleans the cavity preparation and enhances G- SGYL Extra small yellow wedge was then inserted to securely
bonding strength, particularly by increasing microporosity in the position both bands. This method ensures a tight seal at the floor
root dentine. of the cavity. If gaps are visible, the bands can be pushed further
down or a larger wedge can be used. The new wedge design is firmer
STEP 2: SELECTING AND PLACING THE MATRIX BAND yet flexible, making it easier to insert and adapt to narrow spaces
Selecting the appropriate bands is crucial when restoring Class effectively (Figure 3).
II defects, and this becomes even more critical when dealing with
adjacent defects. It is essential to ensure that the marginal ridge is STEP 3: ETCHING AND BONDING
correctly dimensioned and aligns with the occlusal anatomy. This A selective etching technique was employed using a 35% phosphoric
alignment is vital for creating well-defined adjacent triangular fossae acid solution, followed by thorough rinsing with water.
and a properly shaped occlusal embrasure. Therefore, the height of For reliable adhesion, I prefer using a sixth-generation bonding
the marginal ridge largely depends on the choice of band height. system such as Shofu FL-Bond II. This bonding agent effectively
For this case, Garrison Firm Matrix Bands, FXH 175, were selected wets the etched dentin without collapsing the collagen and facilitates
to restore the contact between teeth #14 and #15. To establish a tight penetration into the demineralized area. To maintain a moist
contact point between teeth #15 and #16, one firm band FXH 175 dentinal substrate, apply a generous amount of primer, allow it to sit
and one dead-soft band FX 175(Purple) were used. The firmness undisturbed for 10 seconds, and then air dry for 5 seconds to ensure
of the band material facilitates easy placement and secure fitting, the solvent evaporates. This process mildly acidifies the dentin.
whether using two firm bands or one firm and one dead-soft band. The bonding agent should be applied as an even layer over the
In addition, the firm bands maintain their shape and do not distort entire restorative surface and light-cured for 30 seconds. For shallow
during the composite injection molding procedure, ensuring accurate defects, 10 seconds of light curing may suffice, but deeper defects
and reliable restoration outcomes. require the full 30 seconds to ensure optimal curing. It is crucial that
The bands were positioned by holding them in place with one your light curing unit has a curing depth of at least 10 mm to achieve
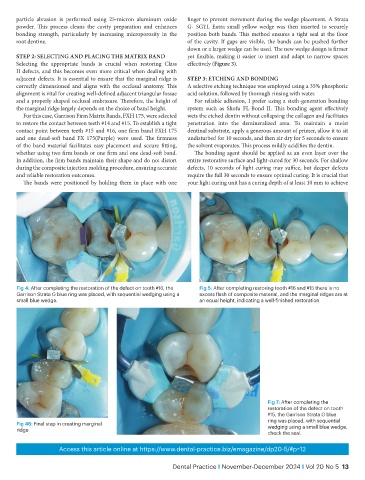
Fig 4: After completing the restoration of the defect on tooth #16, the Fig 5: After completing restoring tooth #16 and #15 there is no
Garrison Strata G blue ring was placed, with sequential wedging using a excess flash of composite material, and the marginal ridges are at
small blue wedge. an equal height, indicating a well-finished restoration
Fig 7: After completing the
restoration of the defect on tooth
#15, the Garrison Strata G blue
ring was placed, with sequential
Fig 46: Final step in creating marginal wedging using a small blue wedge,
ridge
check the seal.
Access this article online at https://www.dental-practice.biz/emagazine/dp20-5/#p=12
Dental Practice I November-December 2024 I Vol 20 No 5 13