
Page 219 - Photoshop for Lightroom Users – Scott Kelby 2nd Edition
P. 219
Content-Aware Fill: Advanced Content-Aware Fill
In the last project, you learned the simple, straightforward way to remove stuff using Content-Aware Fill. But, since this is such important technology,
Adobe created an entire workspace for it, with more advanced features to help you get even better results. Its main advantage is that you can tweak where
Content-Aware Fill pulls its “fix” from within your image. So, it not only makes a smarter choice about where to sample, but it also gives you features like
flipping, rotating, and such that make Content-Aware Fill even more powerful. Don’t use this until you’ve tried the simple method in the previous project
first, but then head back here if you do this stuff as much as I do.
Step One:
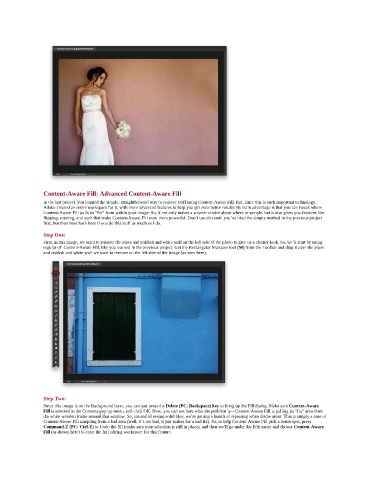
First, in this image, we want to remove the pipes and reddish and white wall on the left side of the photo to give us a cleaner look. So, we’ll start by using
regular ol’ Content-Aware Fill, like you learned in the previous project. Get the Rectangular Marquee tool (M) from the Toolbar and drag it over the pipes
and reddish and white wall we want to remove on the left side of the image (as seen here).
Step Two:
Since this image is on the Background layer, you can just press the Delete (PC: Backspace) key to bring up the Fill dialog. Make sure Content-Aware
Fill is selected in the Contents pop-up menu, and click OK. Now, you can see here what the problem is—Content-Aware Fill is pulling its “fix” area from
the white wooden frame around that window. So, instead of seeing solid blue, we’re getting a bunch of repeating white frame areas. This is simply a case of
Content-Aware Fill sampling from a bad area (well, it’s not bad, it just makes for a bad fix). So, to help Content-Aware Fill pick a better spot, press
Command-Z (PC: Ctrl-Z) to Undo the fill (make sure your selection is still in place), and then we’ll go under the Edit menu and choose Content-Aware
Fill (as shown here) to enter the full editing workspace for this feature.