
Page 39 - Photoshop for Lightroom Users – Scott Kelby 2nd Edition
P. 39
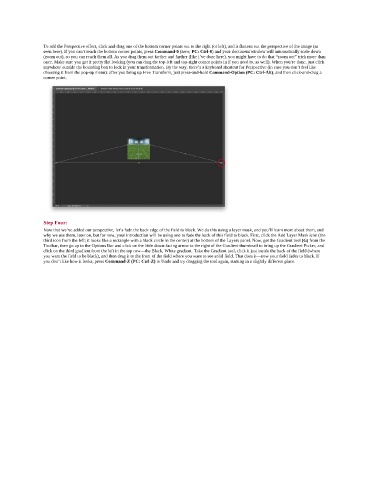
To add the Perspective effect, click and-drag one of the bottom corner points out to the right (or left), and it flattens out the perspective of the image (as
               seen here). If you can’t reach the bottom corner points, press Command-0 (zero; PC: Ctrl-0) and your document window will automatically scale down
               (zoom out), so you can reach them all. As you drag them out farther and farther (like I’ve done here), you might have to do that “zoom out” trick more than
               once. Make sure you get it pretty flat looking (you can drag the top-left and top-right corner points in if you need to, as well). When you’re done, just click
               anywhere outside the bounding box to lock in your transformation. By the way, there’s a keyboard shortcut for Perspective (in case you don’t feel like
               choosing it from the pop-up menu): after you bring up Free Transform, just press-and-hold Command-Option (PC: Ctrl-Alt), and then click-and-drag a
               corner point.


               Step Four:
               Now that we’ve added our perspective, let’s fade the back edge of the field to black. We do this using a layer mask, and you’ll learn more about them, and
               why we use them, later on, but for now, your introduction will be using one to fade the back of this field to black. First, click the Add Layer Mask icon (the
               third icon from the left; it looks like a rectangle with a black circle in the center) at the bottom of the Layers panel. Now, get the Gradient tool (G) from the
               Toolbar, then go up to the Options Bar and click on the little down-facing arrow to the right of the Gradient thumbnail to bring up the Gradient Picker, and
               click on the third gradient from the left in the top row—the Black, White gradient. Take the Gradient tool, click it just inside the back of the field (where
               you want the field to be black), and then drag it to the front of the field where you want to see solid field. That does it—now your field fades to black. If
               you don’t like how it looks, press Command-Z (PC: Ctrl-Z) to Undo and try dragging the tool again, starting in a slightly different place.