
Page 2 - How do I Create a Search for Cash Positioning Worksheets
P. 2
Create a Cash Positioning Search
Fields with an asterisk are required.
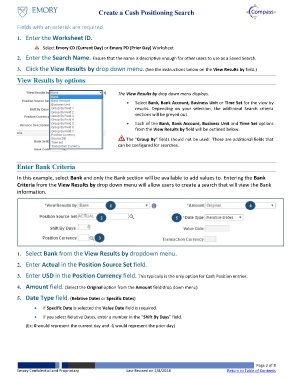
1. Enter the Worksheet ID.
Select Emory CD (Current Day) or Emory PD (Prior Day) Worksheet.
2. Enter the Search Name. Ensure that the name is descriptive enough for other users to use as a Saved Search.
3. Click the View Results by drop down menu. (See the instructions below on the View Results by field.)
View Results by options
The View Results by drop down menu displays.
Select Bank, Bank Account, Business Unit or Time Set for the view by
results. Depending on your selection, the additional Search criteria
sections will be greyed out.
Each of the Bank, Bank Account, Business Unit and Time Set options
from the View Results by field will be outlined below.
The “Group By” fields should not be used. These are additional fields that
can be configured for searches.
Enter Bank Criteria
In this example, select Bank and only the Bank section will be available to add values to. Entering the Bank
Criteria from the View Results by drop down menu will allow users to create a search that will view the Bank
information.
1 4
2 5
3
1. Select Bank from the View Results by dropdown menu.
2. Enter Actual in the Position Source Set field.
3. Enter USD in the Position Currency field. This typically is the only option for Cash Position entries.
4. Amount field. (Select the Original option from the Amount field drop down menu)
5. Date Type field. (Relative Dates or Specific Dates)
If Specific Date is selected the Value Date field is required.
If you select Relative Dates, enter a number in the “Shift By Days” field.
(Ex: 0 would represent the current day and -1 would represent the prior day)
Page 2 of 8
Emory Confidential and Proprietary Last Revised on 2/8/2018 Return to Table of Contents