
Page 1116 - Kitab3DsMax
P. 1116
Part X: Dynamic Animation
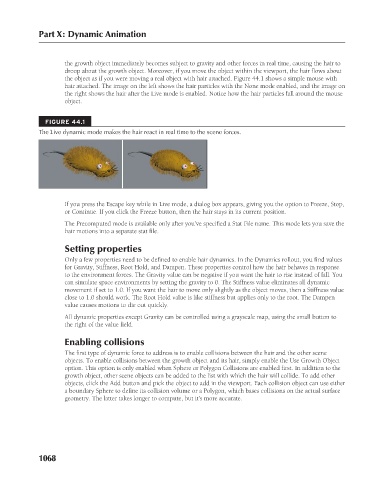
the growth object immediately becomes subject to gravity and other forces in real time, causing the hair to
droop about the growth object. Moreover, if you move the object within the viewport, the hair flows about
the object as if you were moving a real object with hair attached. Figure 44.1 shows a simple mouse with
hair attached. The image on the left shows the hair particles with the None mode enabled, and the image on
the right shows the hair after the Live mode is enabled. Notice how the hair particles fall around the mouse
object.
FIGURE 44.1
The Live dynamic mode makes the hair react in real time to the scene forces.
If you press the Escape key while in Live mode, a dialog box appears, giving you the option to Freeze, Stop,
or Continue. If you click the Freeze button, then the hair stays in its current position.
The Precomputed mode is available only after you’ve specified a Stat File name. This mode lets you save the
hair motions into a separate stat file.
Setting properties
Only a few properties need to be defined to enable hair dynamics. In the Dynamics rollout, you find values
for Gravity, Stiffness, Root Hold, and Dampen. These properties control how the hair behaves in response
to the environment forces. The Gravity value can be negative if you want the hair to rise instead of fall. You
can simulate space environments by setting the gravity to 0. The Stiffness value eliminates all dynamic
movement if set to 1.0. If you want the hair to move only slightly as the object moves, then a Stiffness value
close to 1.0 should work. The Root Hold value is like stiffness but applies only to the root. The Dampen
value causes motions to die out quickly.
All dynamic properties except Gravity can be controlled using a grayscale map, using the small button to
the right of the value field.
Enabling collisions
The first type of dynamic force to address is to enable collisions between the hair and the other scene
objects. To enable collisions between the growth object and its hair, simply enable the Use Growth Object
option. This option is only enabled when Sphere or Polygon Collisions are enabled first. In addition to the
growth object, other scene objects can be added to the list with which the hair will collide. To add other
objects, click the Add button and pick the object to add in the viewport. Each collision object can use either
a boundary Sphere to define its collision volume or a Polygon, which bases collisions on the actual surface
geometry. The latter takes longer to compute, but it’s more accurate.
1068