
Page 375 - Kitab3DsMax
P. 375
Chapter 12: Drawing and Editing 2D Splines and Shapes
6. In the Geometry rollout, click the Attach button and then select the other shapes to add them to
the selected Editable Spline object.
7. Rotate the Perspective viewport until all shapes are visible and easily selectable. Then select each
and rotate each of the cross sections in the Top viewport so their first vertices are aligned. This
helps prevent any twisting that may occur when the cross sections try to align the first vertices.
8. Select the Linear option in the New Vertex Type section in the Geometry rollout, and then click
the Cross Section button. Click the lowest square shape in the Perspective viewport, followed by
the higher square shape, and then the lower small circle. This creates a spline that runs linearly
between these lowest three cross-section shapes. Right-click in the Perspective viewport to exit
Cross Section mode.
9. Select the Bezier option in the New Vertex Type section, and then click the Cross Section button
again. Click the lowest circle shape in the Perspective viewport, followed by the larger circle
shape, and then the higher small circle. This creates a spline that runs smoothly between the last
three cross-section shapes. Right-click in the Perspective viewport to exit Cross Section mode.
Tip
Once a spline outline is constructed, you can use the Surface modifier to add a surface to the object. n
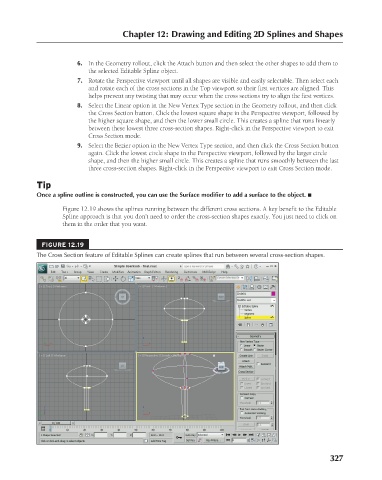
Figure 12.19 shows the splines running between the different cross sections. A key benefit to the Editable
Spline approach is that you don’t need to order the cross-section shapes exactly. You just need to click on
them in the order that you want.
FIGURE 12.19
The Cross Section feature of Editable Splines can create splines that run between several cross-section shapes.
327
6/30/10 4:20 PM
19_617779-ch12.indd 327
19_617779-ch12.indd 327 6/30/10 4:20 PM