
Page 380 - Kitab3DsMax
P. 380
Part III: Modeling Basics
wish to copy and click the Copy button, and then select the vertex to which you want to copy the handle and
press the Paste button. The Paste Length button copies the handle length along with its orientation, if enabled.
Hide/Unhide All
The Hide and Unhide All buttons hide and unhide spline subobjects. They can be used in any subobject
mode. To hide a subobject, select the subobject and click the Hide button. To unhide the hidden subob-
jects, click the Unhide All button.
Bind/Unbind
The Bind button attaches an end vertex to a segment. The bound vertex then cannot be moved indepen-
dently, but only as part of the bound segment. The Unbind button removes the binding on the vertex and
lets it move independently again. To bind a vertex, click the Bind button and then drag from the vertex to
the segment to bind to. To exit Bind mode, right-click in the viewport or click the Bind button again.
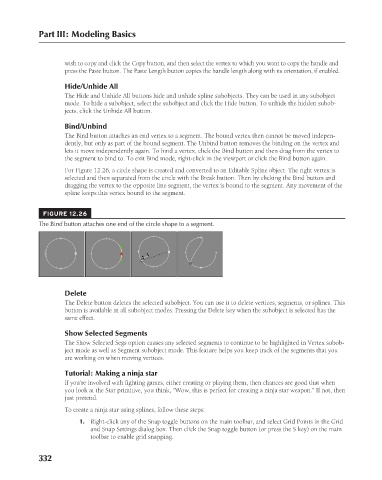
For Figure 12.26, a circle shape is created and converted to an Editable Spline object. The right vertex is
selected and then separated from the circle with the Break button. Then by clicking the Bind button and
dragging the vertex to the opposite line segment, the vertex is bound to the segment. Any movement of the
spline keeps this vertex bound to the segment.
FIGURE 12.26
The Bind button attaches one end of the circle shape to a segment.
Delete
The Delete button deletes the selected subobject. You can use it to delete vertices, segments, or splines. This
button is available in all subobject modes. Pressing the Delete key when the subobject is selected has the
same effect.
Show Selected Segments
The Show Selected Segs option causes any selected segments to continue to be highlighted in Vertex subob-
ject mode as well as Segment subobject mode. This feature helps you keep track of the segments that you
are working on when moving vertices.
Tutorial: Making a ninja star
If you’re involved with fighting games, either creating or playing them, then chances are good that when
you look at the Star primitive, you think, “Wow, this is perfect for creating a ninja star weapon.” If not, then
just pretend.
To create a ninja star using splines, follow these steps:
1. Right-click any of the Snap toggle buttons on the main toolbar, and select Grid Points in the Grid
and Snap Settings dialog box. Then click the Snap toggle button (or press the S key) on the main
toolbar to enable grid snapping.
332
6/30/10 4:20 PM
19_617779-ch12.indd 332 6/30/10 4:20 PM
19_617779-ch12.indd 332