
Page 175 - Zoo Animal Learning and Training
P. 175
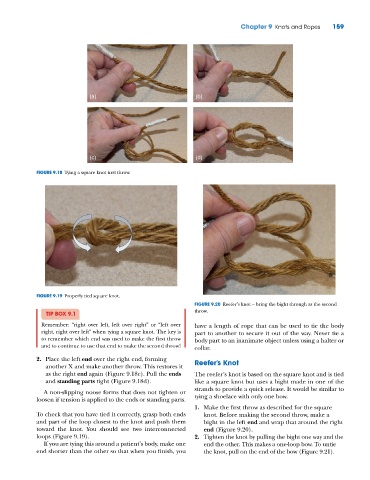
Chapter 9  Knots and Ropes    159


                              (a)                                (b)


                              (c)                                (d)

             FIGURE 9.18  Tying a square knot first throw.


             FIGURE 9.19  Properly tied square knot.
                                                                FIGURE 9.20  Reefer’s knot – bring the bight through as the second
                                                                throw.
                TIP BOX 9.1
               Remember: “right over left, left over right” or “left over   have a length of rope that can be used to tie the body
               right, right over left” when tying a square knot. The key is   part to another to secure it out of the way. Never tie a
               to remember which end was used to make the first throw   body part to an inanimate object unless using a halter or
               and to continue to use that end to make the second throw!  collar.
             2.  Place the left end over the right end, forming
                another X and make another throw. This restores it   Reefer’s Knot
                as the right end again (Figure 9.18c). Pull the ends   The reefer’s knot is based on the square knot and is tied
                and standing parts tight (Figure 9.18d).        like a square knot but uses a bight made in one of the
                                                                strands to provide a quick release. It would be similar to
               A non‐slipping noose forms that does not tighten or
             loosen if tension is applied to the ends or standing parts.  tying a shoelace with only one bow.
                                                                1.  Make the first throw as described for the square
             To check that you have tied it correctly, grasp both ends   knot. Before making the second throw, make a
             and part of the loop closest to the knot and push them   bight in the left end and wrap that around the right
             toward the  knot. You should  see two interconnected   end (Figure 9.20).
             loops (Figure 9.19).                               2.  Tighten the knot by pulling the bight one way and the
               If you are tying this around a patient’s body, make one   end the other. This makes a one‐loop bow. To untie
             end shorter than the other so that when you finish, you   the knot, pull on the end of the bow (Figure 9.21).