
Page 176 - Zoo Animal Learning and Training
P. 176
160 Tasks for the Veterinary Assistant
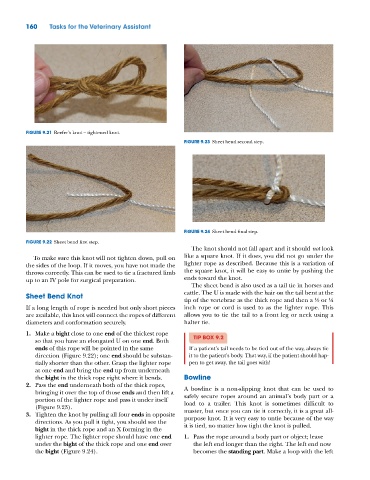
FIGURE 9.21 Reefer’s knot – tightened knot.
FIGURE 9.23 Sheet bend second step.
FIGURE 9.24 Sheet bend final step.
FIGURE 9.22 Sheet bend first step.
The knot should not fall apart and it should not look
To make sure this knot will not tighten down, pull on like a square knot. If it does, you did not go under the
the sides of the loop. If it moves, you have not made the lighter rope as described. Because this is a variation of
throws correctly. This can be used to tie a fractured limb the square knot, it will be easy to untie by pushing the
up to an IV pole for surgical preparation. ends toward the knot.
The sheet bend is also used as a tail tie in horses and
Sheet Bend Knot cattle. The U is made with the hair on the tail bent at the
tip of the vertebrae as the thick rope and then a ½ or ¼
If a long length of rope is needed but only short pieces inch rope or cord is used to as the lighter rope. This
are available, this knot will connect the ropes of different allows you to tie the tail to a front leg or neck using a
diameters and conformation securely. halter tie.
1. Make a bight close to one end of the thickest rope TIP BOX 9.2
so that you have an elongated U on one end. Both
ends of this rope will be pointed in the same If a patient’s tail needs to be tied out of the way, always tie
direction (Figure 9.22); one end should be substan- it to the patient’s body. That way, if the patient should hap-
tially shorter than the other. Grasp the lighter rope pen to get away, the tail goes with!
at one end and bring the end up from underneath
the bight in the thick rope right where it bends. Bowline
2. Pass the end underneath both of the thick ropes, A bowline is a non‐slipping knot that can be used to
bringing it over the top of those ends and then lift a safely secure ropes around an animal’s body part or a
portion of the lighter rope and pass it under itself load to a trailer. This knot is sometimes difficult to
(Figure 9.23).
3. Tighten the knot by pulling all four ends in opposite master, but once you can tie it correctly, it is a great all‐
purpose knot. It is very easy to untie because of the way
directions. As you pull it tight, you should see the it is tied, no matter how tight the knot is pulled.
bight in the thick rope and an X forming in the
lighter rope. The lighter rope should have one end 1. Pass the rope around a body part or object; leave
under the bight of the thick rope and one end over the left end longer than the right. The left end now
the bight (Figure 9.24). becomes the standing part. Make a loop with the left