
Page 11 - Help
P. 11
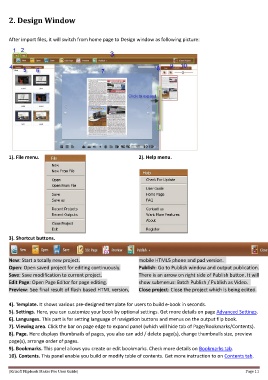
2. Design Window


     After import files, it will switch from home page to Design window as following picture:


     1). File menu.                                            2). Help menu.


     3). Shortcut buttons.


     New: Start a totally new project.                         mobile HTML5 phone and pad version.

     Open: Open saved project for editing continuously.        Publish: Go to Publish window and output publication.
     Save: Save modification to current project.               There is an arrow on right side of Publish button. It will
     Edit Page: Open Page Editor for page editing.             show submenus: Batch Publish / Publish as Video.
     Preview: See final result of flash based HTML version,    Close project: Close the project which is being edited.

     4). Template. It shows various pre-designed template for users to build e-book in seconds.
     5). Settings. Here, you can customize your book by optional settings. Get more details on page Advanced Settings.
     6). Languages. This part is for setting language of navigation buttons and menus on the output flip book.
     7). Viewing area. Click the bar on page edge to expand panel (which will hide tab of Page/Bookmarks/Contents).
     8). Page. Here displays thumbnails of pages, you also can add / delete page(s), change thumbnails size, preview
     page(s), arrange order of pages.
     9). Bookmarks. This panel allows you create or edit bookmarks. Check more details on Bookmarks tab.
     10). Contents. This panel enable you build or modify table of contents. Get more instruction to on Contents tab.


     [Kvisoft Flipbook Maker Pro User Guide]                                                                  Page 11