
Page 277 - Brion Toss - The Complete Rigger’s Apprentice
P. 277
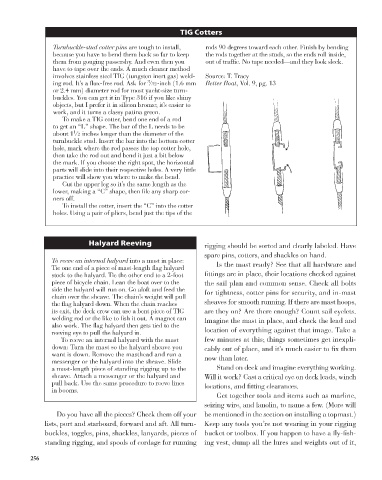
TIG Cotters
                     Turnbuckle-stud cotter pins are tough to install,   rods 90 degrees toward each other. Finish by bending
                     because you have to bend them back so far to keep   the rods together at the studs, so the ends roll inside,
                     them from gouging passersby. And even then you   out of traffic. No tape needed—and they look sleek.
                     have to tape over the ends. A much cleaner method
                     involves stainless steel TIG (tungsten inert gas) weld-  Source: T. Tracy
                                               3
                     ing rod. It’s a flux-free rod. Ask for  ⁄32-inch (1.6 mm   Better Boat, Vol. 9, pg. 13
                    or 2.4 mm) diameter rod for most yacht-size turn-
                    buckles. You can get it in Type 316 if you like shiny
                    objects, but I prefer it in silicon bronze; it’s easier to
                    work, and it turns a classy patina green.
                       To make a TIG cotter, bend one end of a rod
                    to get an “L” shape. The bar of the L needs to be
                          1
                    about 1 ⁄2 inches longer than the diameter of the
                    turnbuckle stud. Insert the bar into the bottom cotter
                    hole, mark where the rod passes the top cotter hole,
                    then take the rod out and bend it just a bit below
                    the mark. If you choose the right spot, the horizontal
                    parts will slide into their respective holes. A very little
                    practice will show you where to make the bend.
                       Cut the upper leg so it’s the same length as the
                    lower, making a “C” shape, then file any sharp cor-
                    ners off.
                       To install the cotter, insert the “C” into the cotter
                    holes. Using a pair of pliers, bend just the tips of the


                              Halyard Reeving                  rigging should be sorted and clearly labeled. Have
                                                               spare pins, cotters, and shackles on hand.
                    To reeve an internal halyard into a mast in place:   Is the mast ready? See that all hardware and
                    Tie one end of a piece of mast-length flag halyard
                    stock to the halyard. Tie the other end to a 2-foot   fittings are in place, their locations checked against
                    piece of bicycle chain. Lean the boat over to the   the sail plan and common sense. Check all bolts
                    side the halyard will run on. Go aloft and feed the   for tightness, cotter pins for security, and in-mast
                    chain over the sheave. The chain’s weight will pull
                    the flag halyard down. When the chain reaches   sheaves for smooth running. If there are mast hoops,
                    its exit, the deck crew can use a bent piece of TIG   are they on? Are there enough? Count sail eyelets.
                    welding rod or the like to fish it out. A magnet can   Imagine the mast in place, and check the lead and
                    also work. The flag halyard then gets tied to the
                    reeving eye to pull the halyard in.        location of everything against that image. Take a
                       To reeve an internal halyard with the mast   few minutes at this; things sometimes get inexpli-
                    down: Turn the mast so the halyard sheave you   cably out of place, and it’s much easier to fix them
                    want is down. Remove the masthead and run a   now than later.
                    messenger or the halyard into the sheave. Slide
                    a mast-length piece of standing rigging up to the   Stand on deck and imagine everything working.
                    sheave. Attach a messenger or the halyard and   Will it work? Cast a critical eye on deck leads, winch
                    pull back. Use the same procedure to reeve lines   locations, and fitting clearances.
                    in booms.
                                                                  Get together tools and items such as marline,
                                                               seizing wire, and lanolin, to name a few. (More will
                      Do you have all the pieces? Check them off your  be mentioned in the section on installing a topmast.)
                  lists, port and starboard, forward and aft. All turn-  Keep any tools you’re not wearing in your rigging
                  buckles, toggles, pins, shackles, lanyards, pieces of  bucket or toolbox. If you happen to have a fly-fish-
                  standing rigging, and spools of cordage for running  ing vest, dump all the lures and weights out of it,

              256