
Page 1133 - 2006 HARLEY FLSTCI SERVICE MANUAL
P. 1133
Insert two breather tubes (9) into the holes in back of the
filter element. Place the element back into position and
(metric) into backplate. Thread bolts loosely into each
cylinder head. Final tighten bolts to 120-144 in-lbs (13.6-
Apply a drop of LOCTITE THREADLOCKER 243
Install screw to secure air cleaner cover. Tighten to
Make sure gasket (7) holes are aligned with back-
Use three TORX screws (4) to secure bracket and
See Figure 9-2. Position new gasket (12) and two new
9.4 1
O-rings (11) on backplate. Insert two breather bolts (10)
filter element. Tighten to 40-60 in-lbs (4.5-6.8 Nm).
(blue) to threads of air cleaner cover screw (1).
2 3
INSTALLATION 16.3 Nm). attach breather tubes to breather bolts. Install air filter element (6) and bracket (5). a. plate holes. b. Install air filter cover (2). a. b. 36-60 in-lbs (4.1-6.8 Nm). 6 5 4 11 mm breather bolt (2) @ 120-144 in-lbs (13.6-16.2 Nm)
9
4.
2.
3.
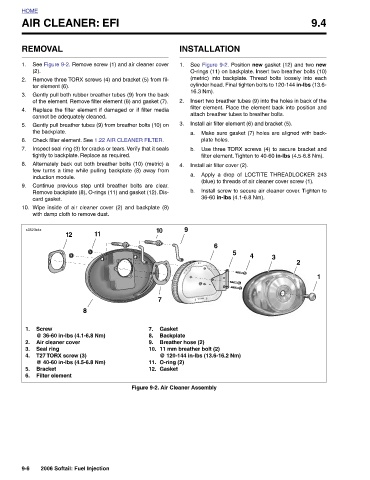
1.
Gasket Backplate Breather hose (2) O-ring (2) Gasket Figure 9-2. Air Cleaner Assembly
10 7
7. 8. 9. 10. 11. 12.
AIR CLEANER: EFI See Figure 9-2. Remove screw (1) and air cleaner cover Remove three TORX screws (4) and bracket (5) from fil- ter element (6). Gently pull both rubber breather tubes (9) from the back of the element. Remove filter element (6) and gasket (7). Replace the filter element if damaged or if filter media cannot be adequately cleaned. Gently pull breather tubes (9) from breather bolts (10) on Check filter element. See 1.22 AIR CLEANER FILTER. Inspect seal ring (3) for cracks or tears. Verify that it seals tightly to backplate. Replace as required. Alternately back out both breather bolts (10) (metric) a few turns a time while pulling backplat
HOME REMOVAL 1. (2). 2. 3. 4. 5. the backplate. 6. 7. 8. 9. card gasket. 10. s0523x4x Screw 1. 2. Seal ring 3. 4. Bracket 5. 6. 9-6