
Page 42 - Norco Patient Orientation Handbook e-book
P. 42
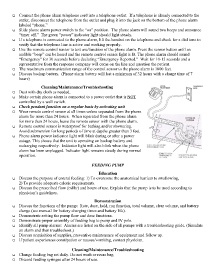
Connect the phone alarm telephone cord into a telephone outlet. If a telephone is already connected to the
outlet, disconnect the telephone from the outlet and plug it into the jack on the bottom of the phone alarm
labeled “phone.”
Slide phone alarm power switch to the “on” position. The phone alarm will sound two beeps and announce
“timer off.” The green “power” indicator light should light steady.
If a telephone is connected to the phone alarm, lift the handset on the telephone and check for a dial tone to
verify that the telephone line is active and working properly.
Use the remote control sensor to test use/function of the phone alarm. Press the sensor button until an
audible “beep” can be heard and the remote control sensor light is lit. The phone alarm should sound
“Emergency” for 30 seconds before declaring “Emergency Reported.” Wait for 10-15 seconds and a
representative from the response company will come on the line and question the patient.
The maximum communication range of the control sensor to the phone alarm is 1000 feet.
Discuss backup battery. (Phone alarm battery will last a minimum of 32 hours with a charge time of 7
hours)
Cleaning/Maintenance/Troubleshooting
Dust with dry cloth as needed.
Make certain phone alarm is connected to a power outlet that is NOT
controlled by a wall switch.
Check pendant function on a regular basis by activating unit
Wear remote control sensor at all times unless separated from the phone
alarm for more than 24 hours. When separated from the phone alarm
for more than 24 hours, leave the remote sensor with the phone alarm.
Remote control sensor is waterproof for bathing and/or showering.
Avoid submersion for long periods of time at depths greater than 3 feet.
Phone alarm power indicator light will blink during or after a power
outage. This shows that the unit is operating on backup battery and
recharging respectively. Indicator light will also blink when the phone
alarm has been unplugged. Indicator light remains steady during normal
operation.
FEEDING PUMP
Education
Discuss the purpose of enteral feeding: 1) To overcome the anatomical barriers to swallowing,
2) To provide adequate caloric requirements.
Discuss the prescribed flow (ml/hr) and hours of use. Explain that the pump is to be used according to
physician’s guidelines.
Demonstration
Discuss the functions of the pump: Rate, dose, hold, run function, total volume, clear volume, and battery
charge (see manual for battery charging times and battery life).
Demonstrate setting the pump flow and dose functions.
Demonstrate proper assembly of feeding bag to pump and IV pole.
Identify all pump alarms: Alarms are listed on the side of all pumps with a troubleshooting guide. (Simulate
an alarm and then troubleshoot.)
Discuss acquisition of supplies, preventive maintenance of equipment and follow up.
If patient experiences constipation or nausea/vomiting, contact physician.
Cleaning/Maintenance/Troubleshooting
Change feeding bag set daily. Do not wash or reuse bag.
Discard feeding syringes after 24 hours of use.