Page 14 - ST Sept
P. 14

METALWORKING EQUIPMENT                                                                                                                                                                               METALWORKING EQUIPMENT
         AND TOOLS                                                                                                                                                                                            AND TOOLS
        and copper, which is in the pseudo-alloy in an unbound state, passes from the roller into a solid                                                                                         Samples with coatings based on Ti-Al-N
        solution of austenite.                                                                                                                                                             and Mo-Cr-N were manufactured at OOO NPF
               Upon  cooling,  the  austenite  solution is supersaturated  with tungsten,  and  the  excess                                                                                Plazmacer (St. Petersburg). Comparative tests
        tungsten precipitates in the form of a tungsten carbide network (Fig. 2) along the boundaries of                                                                                   of  the wear resistance  of  the  samples  were
        austenite grains lightly alloyed with tungsten. In this case, the resulting structure is identical to                                                                              carried out on an automated installation based
        the structure of cast high speed steel, corresponding to a complex carbide eutectic, reminiscent                                                                                   on  the  MI-1M  friction  machine  designed  for
        of ledeburite and located along the grain boundaries. Vickers microhardness was measured on                                                                                        tribotechnical tests  of  cylindrical specimens
        a microhardness meter mod. PMT-3M with a load of 200 gr. The measurement of the diagonals                                                                                          made of metallic materials and alloys, allowing
        of the prints was carried out using an inverted metallographic microscope Metam LV-34 using                                                                                        to determine  the  tribotechnical indicators of
        the automated analysis system "Micro-Analysis View".                                                                                                                               surfaces  in conditions of  sliding  friction  with
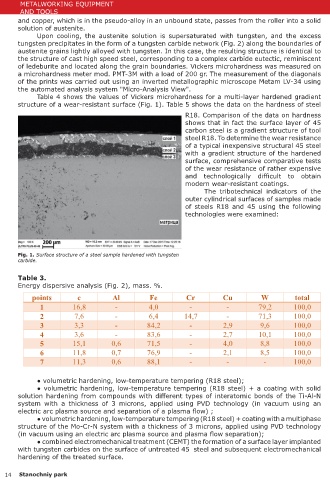
               Table 4 shows the values of Vickers microhardness for a multi-layer hardened gradient                                                                                       boundary  lubrication using the  normalized
        structure of a wear-resistant surface (Fig. 1). Table 5 shows the data on the hardness of steel                                                                                    method [5].
                                                                       R18. Comparison of the data on hardness                                                                                    During  tests  with  a  specified  load  and
                                                                       shows that in fact the surface layer of 45                                                                          sliding speed, a stationary cylindrical indenter
                                                                       carbon steel is a gradient structure of tool              Fig. 2. Microstructure of layer 1 (tungsten carbide particles)   was  pressed  against  the  rotating  cylindrical
                                                                       steel R18. To determine the wear resistance               and layer 2 (tungsten carbide mesh along the boundaries of   surface  of  the  sample  partially immersed in
                                                                       of a typical inexpensive structural 45 steel              austenite grains.
                                                                       with a gradient structure of the hardened                 the  lubricant.  To  install the  samples  and  the
                                                                       surface, comprehensive comparative tests                  indenter,  a  scheme  with replaceable  holders
                                                                       of the wear resistance of rather expensive                was  used,  which provides  self-alignment  of
                                                                       and  technologically  difficult  to  obtain               the indenter relative to the test surface of the
                                                                       modern wear-resistant coatings.                           sample  on  an  intermediate  spherical  support
                                                                              The  tribotechnical  indicators  of  the           for  the  implementation  of  a  linear  contact.
                                                                       outer cylindrical surfaces of samples made                During  the  tests,  using  a  system  of  sensors,
                                                                       of  steels R18 and  45  using the  following              the test time, load, coefficient of friction and
                                                                       technologies were examined:                               linear  wear  were  recorded  continuously  and
                                                                                                                                 synchronously.  Their numerical  values  were
                                                                                                                                 displayed  on  a  personal  computer  monitor.
                                                                                                                                 To measure the moment of friction and load,
                                                                                                                                 strain gauges  were  used.  For  continuous
        Fig. 1. Surface structure of a steel sample hardened with tungsten                                                       measurement of wear during testing, a special
        carbide.                                                                                                                 circuit was  developed  with the  use  of  an               Fig. 3. Results of tests of a sample of R18 steel after
                                                                                                                                 inductive  sensor, which makes  it possible to              volumetric quenching and low-temperature tempering.
        Table 3.                                                                                                                 exclude the influence of the radial runout and
        Energy dispersive analysis (Fig. 2), mass. %.                                                                            thermal deformations of the test specimen on the measurement results.
                                                                                                                                        According  to  the  results  of  the  analysis  of  the  registered  parameters,  the  following
             points           c             Al            Fe           Cr            Cu             W           total            indicators of tribotechnical properties were determined:
                1           16,8            -            4,0             -             -           79,2         100,0                   ● running-in time t0, h, defined as the time from the start of the test to the time when
                2            7,6            -            6,4           14,7            -           71,3         100,0            the wear curve reaches the normal wear area;

                3            3,3            -            84,2            -           2,9           9,6          100,0
                4            3,6            -            83,6            -           2,7           10,1         100,0
                5           15,1           0,6           71,5            -           4,0           8,8          100,0            Table 4.
                6           11,8           0,7           76,9            -           2,1           8,5          100,0            Microhardness of the surface layer of 45 steel, hardened with tungsten carbide.
                7           11,3           0,6           88,1            -             -             -          100,0                                                      Microhardness of HV layer
                                                                                                                                             layer 1                     layer 2                     layer 3                      matrix

               ● volumetric hardening, low-temperature tempering (R18 steel);                                                              741…846                      546…633                     431…525                     304…332
               ● volumetric hardening, low-temperature tempering (R18 steel) + a coating with solid
        solution hardening from compounds with different types of interatomic bonds of the Ti-Al-N                               Table 5.
        system  with a thickness of  3 microns,  applied using PVD  technology  (in vacuum  using an                             The hardness of steel R18 in the heat-treated state at elevated temperatures
        electric arc plasma source and separation of a plasma flow) ;                                                                          Test temperature ºC                       HV                             HRC
               ● volumetric hardening, low-temperature tempering (R18 steel) + coating with a multiphase                                                200                              815                              64
        structure of the Mo-Cr-N system with a thickness of 3 microns, applied using PVD technology                                                     400                              755                              62
        (in vacuum using an electric arc plasma source and plasma flow separation);                                                                     500                              712                              60
               ● combined electromechanical treatment (CEMT) the formation of a surface layer implanted                                                 550                              661                              58
        with tungsten carbides on the surface of untreated 45  steel and subsequent electromechanical                                                   600                              615                              56
        hardening of the treated surface.                                                                                                               650                              504                              51

   14   Stanochniy park                                                                                                                                                                                                     Stanochniy park       15
   9   10   11   12   13   14   15   16   17   18   19