
Page 678 - Chief Architect Reference Manual
P. 678
Chief Architect X10 Reference Manual
sponds to the columns’ left-to-right order • Select one item in the list and click the
in the schedule. At least one column must Move Down button to adjust its position
be included to create a schedule. downward in the list.
• Select or double-click on an item in the Objects to Include - Check the box
list and click the Rename button to spec- 6 beside each type of object you want to
ify a new name. include in the selected schedule. For a
• Click the Reset button to restore the description of these options, see “Columns
default names for all Columns to Include and Objects to Include” on page 672.
in the current schedule.
• Select one or more items in the list, then You can create multiple unique sched-
click the Remove button to remove those ules using the Columns to Include and
items from the list. Objects to Include as filters. See “Working
with Multiple Schedules” on page 674.
• Select one item in the list and click the
Move Up button to adjust its position
upward in the list.
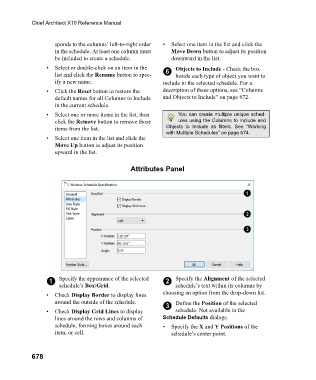
Attributes Panel
1 Specify the appearance of the selected 2 Specify the Alignment of the selected
schedule’s Box/Grid. schedule’s text within its columns by
• Check Display Border to display lines choosing an option from the drop-down list.
around the outside of the schedule. Define the Position of the selected
3
• Check Display Grid Lines to display schedule. Not available in the
lines around the rows and columns of Schedule Defaults dialogs.
schedule, forming boxes around each • Specify the X and Y Positions of the
item, or cell. schedule’s center point.
678