
Page 221 - FreesStyler® Installation and Startup
P. 221
®
INSTALLATION AND STARTUP
Chapter 10 Initial Startup
Startup Procedure
Vehicle Testing
g) Locate your supplied Programming Manual. Read and understand the following:
• Chapter 5: Operator Interface/Programming
• Chapter 6: Operator Interface/Advanced Configuration
The system arrives pre-programmed with all Packages set at 6 passes. You can change them later to accommodate the
needs of your marketing plan, purchased equipment, signage or customer base.
All wheel speeds and wheel penetration have been set to a reasonable starting point. These also can be adjusted to your
preference later.
h) At the HMI or through the POS, enter a Package into the QUEUE and run a test vehicle.
i) Wash a vehicle while watching the following:
• Soap spray pattern over the vehicle
• While viewing from the exit end of the bay, observe the Exit Wheels on both sides for equal penetration. If one side
is lighter than the other to make them equal (see picture below). This is very important to wash quality.
• While viewing from the entrance end of the bay, observe the Entrance Wheels on both sides for equal penetration
while the the Carriage wheels are moving from entrance to exit (adjustments made at the Low Pressure Regulator).
Now observe movement from exit to entrance (adjustments made at the High Pressure Regulator). If one side is
lighter than the other to make them equal at the locations stated above (see picture below).
When both driver side and passenger side have equal penetration, adjust the air pressure to achieve your final
desired penetration
• While viewing from the exit end of the bay, observe the Top Wheel’s Neo-Tex® fingers extending over the vehicle.
Confirm desired penetration while the wheel is moving from entrance to exit. Now observe movement from exit to
entrance. To achieve desired penetration, add or remove Top Wheel Counter Weights (as shown on page 10-11
STEP 2).
When all penetrations have been set, “fine-adjustments” can be made at the flow controls if necessary. NOTE:
Entrance, Driver Side Wheel should come in slower than the passenger side wheel for best cleaning and the “wig-
wag” (side-to-side motion) of the Entrance Wheels.
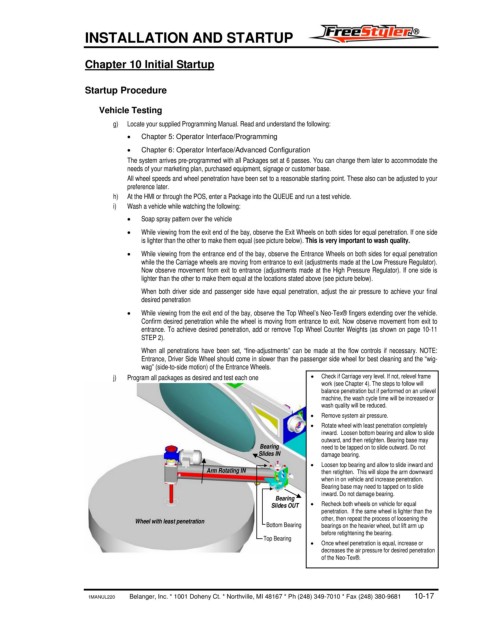
j) Program all packages as desired and test each one • Check if Carriage very level. If not, relevel frame
work (see Chapter 4). The steps to follow will
balance penetration but if performed on an unlevel
machine, the wash cycle time will be increased or
wash quality will be reduced.
• Remove system air pressure.
• Rotate wheel with least penetration completely
inward. Loosen bottom bearing and allow to slide
outward, and then retighten. Bearing base may
Bearing need to be tapped on to slide outward. Do not
Slides IN damage bearing.
• Loosen top bearing and allow to slide inward and
Arm Rotating IN then retighten. This will slope the arm downward
when in on vehicle and increase penetration.
Bearing base may need to tapped on to slide
inward. Do not damage bearing.
Bearing
Slides OUT • Recheck both wheels on vehicle for equal
penetration. If the same wheel is lighter than the
Wheel with least penetration other, then repeat the process of loosening the
Bottom Bearing bearings on the heavier wheel, but lift arm up
before retightening the bearing.
Top Bearing
• Once wheel penetration is equal, increase or
decreases the air pressure for desired penetration
of the Neo-Tex®.
1MANUL220 Belanger, Inc. * 1001 Doheny Ct. * Northville, MI 48167 * Ph (248) 349-7010 * Fax (248) 380-9681 10-17