
Page 21 - DuraTrans XD® Conveyor
P. 21
DURATRANS XD® CONVEYOR
Installation
Preparing the Pit
14) As you move down the tunnel, you should be able to see the floor is poured with an upward
pitch of 1/4” per 10 feet.
Note: This will insure that the vehicle will travel through the wash with consistent pressure on the
Rollers. If the floor varies more than 1/2” over 10 feet, call your local Belanger®
Representative or Belanger® Technical Support.
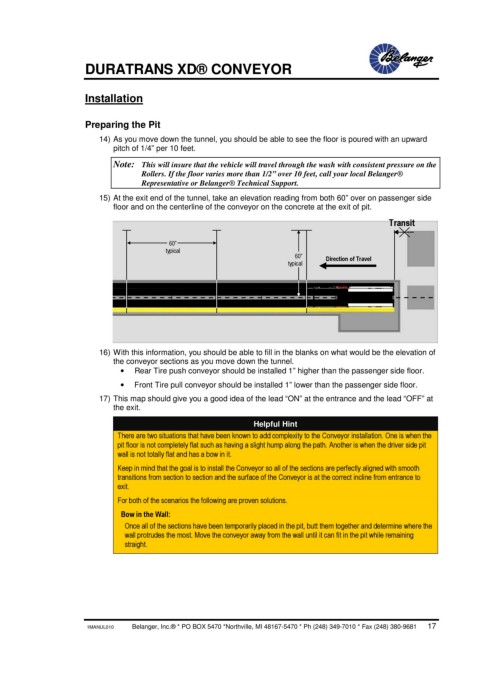
15) At the exit end of the tunnel, take an elevation reading from both 60” over on passenger side
floor and on the centerline of the conveyor on the concrete at the exit of pit.
Transit
60”
typical
60” Direction of Travel
typical
16) With this information, you should be able to fill in the blanks on what would be the elevation of
the conveyor sections as you move down the tunnel.
· Rear Tire push conveyor should be installed 1” higher than the passenger side floor.
· Front Tire pull conveyor should be installed 1” lower than the passenger side floor.
17) This map should give you a good idea of the lead “ON” at the entrance and the lead “OFF” at
the exit.
Helpful Hint
There are two situations that have been known to add complexity to the Conveyor installation. One is when the
pit floor is not completely flat such as having a slight hump along the path. Another is when the driver side pit
wall is not totally flat and has a bow in it.
Keep in mind that the goal is to install the Conveyor so all of the sections are perfectly aligned with smooth
transitions from section to section and the surface of the Conveyor is at the correct incline from entrance to
exit.
For both of the scenarios the following are proven solutions.
Bow in the Wall:
Once all of the sections have been temporarily placed in the pit, butt them together and determine where the
wall protrudes the most. Move the conveyor away from the wall until it can fit in the pit while remaining
straight.
1MANUL010 Belanger, Inc.® * PO BOX 5470 *Northville, MI 48167-5470 * Ph (248) 349-7010 * Fax (248) 380-9681 17