
Page 160 - Divyank Tyagi
P. 160
126 | ChaPTer 4 Configuring TemplaTes and sTandards
Simple These patterns are generated with parallel or crosshatch lines that can have different
angles and spacing. With both the crosshatch and parallel options, you can specify only one
angle for the entire pattern. Using crosshatch, you can set two spacing values.
Custom To create a more complex custom pattern, you have to import a pattern (PAT) file
from an external source. This is often necessary because of the current limitation in creating
natively complex patterns. Your office may have a set of established patterns that have been
used for years, and the Custom option allows you to import and reuse them without having to
make them again from scratch. Custom patterns let you import a PAT file from anywhere on
your hard drive or on a network and use it as a base pattern for a new fill pattern.
Creating a New Simple Pattern
To create a new simple pattern, first choose either Model or Drafting, and then click the New
button. A generic pattern appears in the New Pattern dialog box. You can then design your
pattern and assign orientation behavior.
The option Orientation In Host Layers is particularly useful when you’re making drafting
patterns. This option allows you to specify how a pattern orients itself relative to host elements
such as walls, floors, roofs, and ceilings when they’re represented as cut. Note that the option
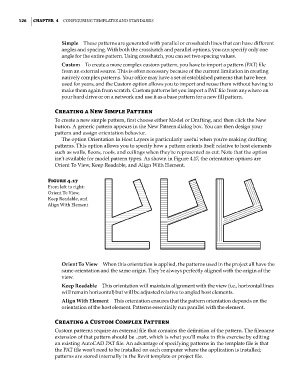
isn’t available for model pattern types. As shown in Figure 4.17, the orientation options are
Orient To View, Keep Readable, and Align With Element.
Figure 4.17
from left to right:
orient To View,
Keep readable, and
align With element
Orient To View When this orientation is applied, the patterns used in the project all have the
same orientation and the same origin. They’re always perfectly aligned with the origin of the
view.
Keep Readable This orientation will maintain alignment with the view (i.e., horizontal lines
will remain horizontal) but will be adjusted relative to angled host elements.
Align With Element This orientation ensures that the pattern orientation depends on the
orientation of the host element. Patterns essentially run parallel with the element.
Creating a Custom Complex Pattern
Custom patterns require an external file that contains the definition of the pattern. The filename
extension of that pattern should be .pat, which is what you’ll make in this exercise by editing
an existing AutoCAD PAT file. An advantage of specifying patterns in the template file is that
the PAT file won’t need to be installed on each computer where the application is installed;
patterns are stored internally in the Revit template or project file.
c04.indd 126 5/3/2014 10:36:59 AM