
Page 203 - Divyank Tyagi
P. 203
|
enabling Worksharing on Your ProjeCT 169
Another use for the starting view is as a project bulletin board. Simply create a drafting view
for the starting view and keep it populated with project standards, modeling action items, and
other notes your team might need to know.
Synchronize the central file once again, and remember to relinquish any worksets you might
have obtained during the configuration of the central file. From the Application menu click
Close to close the central file.
Use Caution When Using a Central File
once you’ve created a central file, there are a couple of things you cannot do. Don’t open it directly
again and don’t change the filename. opening the file will change its attributes, and none of your
team members will be able to synchronize with central. if they were actively working in the local
file, their work would be lost. The same problem occurs if you change the filename—anyone with a
local copy will lose their association to the central file and they will not be able to save their work.
Creating a Local File
Now that you’ve made a central file, you’ll need to create a local copy of it in which you will
organize worksets for team collaboration and continue your design and documentation. There
are several ways to perform this action. One option is to simply open the network location of
the central file and copy the file from the network to your desktop or anywhere on your local
hard drive. Be careful not to move the file—only copy it. It’s also a good idea to rename the file to
something that identifies it as a local file, such as ***-Local.rvt.
Another method of creating a local file is to utilize a script or macro. There are many
variations of this method, so we won’t discuss them in detail here. We believe the simplest
example of a script is to use common Windows commands in a BAT file. You can create a BAT
file in any simple text editor such as Windows Notepad, and you will find a command-line
reference in Windows Help and Support on your computer (search for commands). You can also
find a free tool on David Baldacchino’s blog at:
http://do-u-revit.blogspot.com/2008/03/streamlining-local-file-creation.html
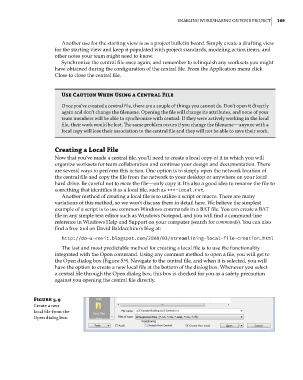
The last and most predictable method for creating a local file is to use the functionality
integrated with the Open command. Using any common method to open a file, you will get to
the Open dialog box (Figure 5.9). Navigate to the central file, and when it is selected, you will
have the option to create a new local file at the bottom of the dialog box. Whenever you select
a central file through the Open dialog box, this box is checked for you as a safety precaution
against you opening the central file directly.
Figure 5.9
Create a new
local file from the
open dialog box.
c05.indd 169 05-05-2014 16:44:30