
Page 267 - Divyank Tyagi
P. 267
|
InsertIng CaD Data 233
Using Options During Importing/Linking
After you have configured the necessary settings for inserted CAD data and decided on
whether to import or link, you need to understand certain options during the import/link
process. We’ll discuss the preferred settings for each of the options based on real-world
situations in the sections “Using Inserted 2D Data” and “Using Inserted 3D Data.” To place your
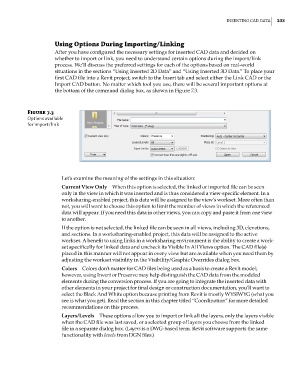
first CAD file into a Revit project, switch to the Insert tab and select either the Link CAD or the
Import CAD button. No matter which tool you use, there will be several important options at
the bottom of the command dialog box, as shown in Figure 7.3.
Figure 7.3
options available
for import/link
Let’s examine the meaning of the settings in this situation:
Current View Only When this option is selected, the linked or imported file can be seen
only in the view in which it was inserted and is thus considered a view-specific element. In a
worksharing-enabled project, this data will be assigned to the view’s workset. More often than
not, you will want to choose this option to limit the number of views in which the referenced
data will appear. If you need this data in other views, you can copy and paste it from one view
to another.
If the option is not selected, the linked file can be seen in all views, including 3D, elevations,
and sections. In a worksharing-enabled project, this data will be assigned to the active
workset. A benefit to using links in a worksharing environment is the ability to create a work-
set specifically for linked data and uncheck its Visible In All Views option. The CAD file(s)
placed in this manner will not appear in every view but are available when you need them by
adjusting the workset visibility in the Visibility/Graphic Overrides dialog box.
Colors Colors don’t matter for CAD files being used as a basis to create a Revit model;
however, using Invert or Preserve may help distinguish the CAD data from the modeled
elements during the conversion process. If you are going to integrate the inserted data with
other elements in your project for final design or construction documentation, you’ll want to
select the Black And White option because printing from Revit is mostly WYSIWYG (what you
see is what you get). Read the section in this chapter titled “Coordination” for more detailed
recommendations on this process.
Layers/Levels These options allow you to import or link all the layers, only the layers visible
when the CAD file was last saved, or a selected group of layers you choose from the linked
file in a separate dialog box. (Layers is a DWG-based term. Revit software supports the same
functionality with levels from DGN files.)
c07.indd 233 5/3/2014 10:48:53 AM