
Page 292 - Divyank Tyagi
P. 292
258 | ChaptEr 7 InteroperabIlIty: WorkIng MultIplatforM
Unfortunately, you cannot customize the naming of the exported files when you export more
than one view in a batch process. That said, any kind of file-renaming tool can be used to remove
the prefix FloorPlan- from exported files using the Automatic - Short option. The resulting files
would be compliant with the naming conventions specified in the BIM execution plan.
Exporting 3D Model Data
You can also export your Revit project as a 3D model in several formats for use in other
®
®
modeling software. A frequent destination for such data is Autodesk Navisworks software
for its enhanced coordination with contractors during construction. This workflow is supported
by a free Navisworks plug-in to Revit that will allow you to export your models as NWC files,
which Navisworks uses. More generic exports in DWG, DGN, DXF, or SAT formats can provide
numerous opportunities for you to become more creative with the presentation of your designs.
Exporting to SketchUp
Previously in this chapter we discussed using SketchUp for conceptual building massing
studies. These studies were imported directly into the Revit environment for further
development of a true building information model. Revit model data can also be exported via
3D DWG to SketchUp, where visualization studies can be conducted on an entire project or even
a simple wall section.
In the following exercise, we will export a wall section study from the Revit environment to
SketchUp using files you can download from the book’s web page:
1. Open the file c07-Sketchup-Wall-Study.rvt.
2. Activate the Default 3D view and enable the Section Box option in the Properties palette
for the view.
3. Set the detail level of the view to Medium or Fine.
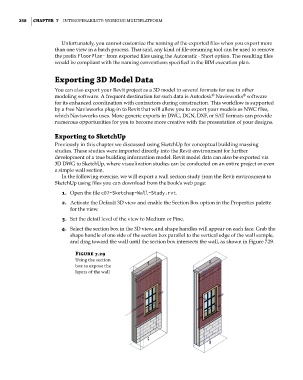
4. Select the section box in the 3D view, and shape handles will appear on each face. Grab the
shape handle of one side of the section box parallel to the vertical edge of the wall sample,
and drag toward the wall until the section box intersects the wall, as shown in Figure 7.29.
Figure 7.29
using the section
box to expose the
layers of the wall
c07.indd 258 5/3/2014 10:49:01 AM