
Page 476 - Divyank Tyagi
P. 476
442 | ChaptER 11 Visualization
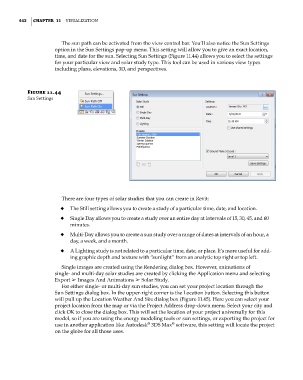
The sun path can be activated from the view control bar. You’ll also notice the Sun Settings
option in the Sun Settings pop-up menu. This setting will allow you to give an exact location,
time, and date for the sun. Selecting Sun Settings (Figure 11.44) allows you to select the settings
for your particular view and solar study type. This tool can be used in various view types
including plans, elevations, 3D, and perspectives.
Figure 11.44
sun settings
There are four types of solar studies that you can create in Revit:
◆ ◆ The Still setting allows you to create a study of a particular time, date, and location.
◆ ◆ Single Day allows you to create a study over an entire day at intervals of 15, 30, 45, and 60
minutes.
◆ ◆ Multi-Day allows you to create a sun study over a range of dates at intervals of an hour, a
day, a week, and a month.
◆ ◆ A Lighting study is not related to a particular time, date, or place. It’s more useful for add-
ing graphic depth and texture with “sunlight” from an analytic top right or top left.
Single images are created using the Rendering dialog box. However, animations of
single- and multi-day solar studies are created by clicking the Application menu and selecting
Export ➢ Images And Animations ➢ Solar Study.
For either single- or multi-day sun studies, you can set your project location through the
Sun Settings dialog box. In the upper-right corner is the Location button. Selecting this button
will pull up the Location Weather And Site dialog box (Figure 11.45). Here you can select your
project location from the map or via the Project Address drop-down menu. Select your city and
click OK to close the dialog box. This will set the location of your project universally for this
model, so if you are using the energy modeling tools or sun settings, or exporting the project for
®
®
use in another application like Autodesk 3DS Max software, this setting will locate the project
on the globe for all those uses.
c11.indd 442 5/3/2014 11:07:11 AM