
Page 515 - Divyank Tyagi
P. 515
|
using extended Modeling teChniques for BasiC Walls 481
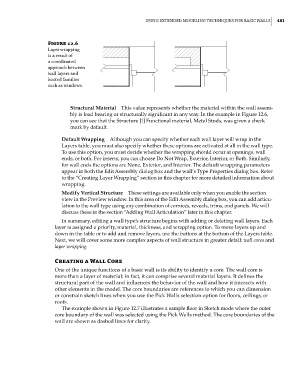
Figure 12.6
layer wrapping
is a result of
a coordinated
approach between
wall layers and
hosted families
such as windows.
Structural Material This value represents whether the material within the wall assem-
bly is load bearing or structurally significant in any way. In the example in Figure 12.6,
you can see that the Structure [1] Functional material, Metal Studs, was given a check
mark by default.
Default Wrapping Although you can specify whether each wall layer will wrap in the
Layers table, you must also specify whether these options are activated at all in the wall type.
To use this option, you must decide whether the wrapping should occur at openings, wall
ends, or both. For inserts, you can choose Do Not Wrap, Exterior, Interior, or Both. Similarly,
for wall ends the options are None, Exterior, and Interior. The default wrapping parameters
appear in both the Edit Assembly dialog box and the wall’s Type Properties dialog box. Refer
to the “Creating Layer Wrapping” section in this chapter for more detailed information about
wrapping.
Modify Vertical Structure These settings are available only when you enable the section
view in the Preview window. In this area of the Edit Assembly dialog box, you can add articu-
lation to the wall type using any combination of cornices, reveals, trims, and panels. We will
discuss these in the section “Adding Wall Articulation” later in this chapter.
In summary, editing a wall type’s structure begins with adding or deleting wall layers. Each
layer is assigned a priority, material, thickness, and wrapping option. To move layers up and
down in the table or to add and remove layers, use the buttons at the bottom of the Layers table.
Next, we will cover some more complex aspects of wall structure in greater detail: wall cores and
layer wrapping.
Creating a Wall Core
One of the unique functions of a basic wall is its ability to identify a core. The wall core is
more than a layer of material; in fact, it can comprise several material layers. It defines the
structural part of the wall and influences the behavior of the wall and how it interacts with
other elements in the model. The core boundaries are references to which you can dimension
or constrain sketch lines when you use the Pick Walls selection option for floors, ceilings, or
roofs.
The example shown in Figure 12.7 illustrates a sample floor in Sketch mode where the outer
core boundary of the wall was selected using the Pick Walls method. The core boundaries of the
wall are shown as dashed lines for clarity.
c12.indd 481 5/3/2014 11:12:30 AM