
Page 771 - Divyank Tyagi
P. 771
|
creating scheDules anD legenDs 737
If you are working through all the exercises in this chapter, continue with the c17-Sample-
Building-Start.rvt or c17-Sample-Metric-Start.rvt file from this book’s web page. To
create the schedule, follow these steps:
1. From the View tab in the ribbon, select Schedules and then Schedule/Quantities. From
the Categories list, select the Area (Usable Area) schedule type and click OK.
2. On the Fields tab, notice that the available fields in an area table are much more limited
than they were in the Walls table in the previous exercise. For this schedule, you need
only four fields:
◆ ◆ Level
◆ ◆ Name
◆ ◆ Area Type
◆ ◆ Area
Choose those from the Fields list on the left, and using the Add button, move them to the
right or double-click the names to move them from one side to the other.
Remember that the order of the fields in this list will determine the order of the columns
in your final schedule. Use the Move Up and Move Down buttons as needed to order the
list correctly.
3. Next, choose the Sorting/Grouping tab. From the first pull-down menu, choose to sort
by Level and check the Header and Footer boxes with the Totals Only option. Check the
Itemize Every Instance option at the bottom. Also, select the Grand Totals option, and
from the associated pull-down, choose Title And Totals.
4. In this schedule, you want to make the areas read as they would in a spreadsheet—right
justified and totaled. Choose the Formatting tab and select Area from the list on the left.
Change the justification to Right and check the Calculate Totals box. Select the Level field
and check the Hidden Field box.
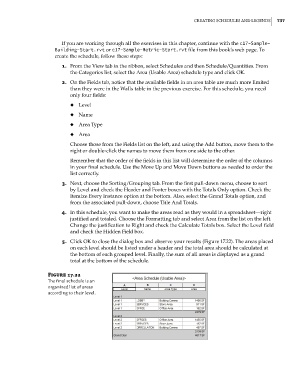
5. Click OK to close the dialog box and observe your results (Figure 17.22). The areas placed
on each level should be listed under a header and the total area should be calculated at
the bottom of each grouped level. Finally, the sum of all areas is displayed as a grand
total at the bottom of the schedule.
Figure 17.22
The final schedule is an
organized list of areas
according to their level.
c17.indd 737 5/3/2014 11:46:29 AM