
Page 859 - Divyank Tyagi
P. 859
|
unDerstanDing CoLor FiLL LegenDs 825
7. Open the Level 1 – Dept - Color floor plan and click the Color Fill Legend button in the
Color Fill panel of the Annotate tab. This will activate the Color Fill Legend tool and ask
you to place a legend somewhere in the active view. Anywhere for now is fine—just place
it to one side of the plan or the other.
Once the legend is placed, you can then define and customize its characteristics.
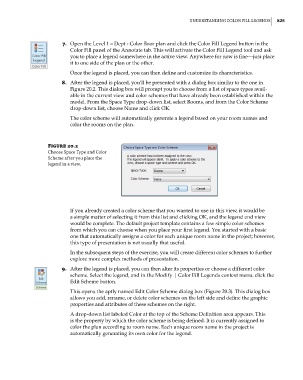
8. After the legend is placed, you’ll be presented with a dialog box similar to the one in
Figure 20.2. This dialog box will prompt you to choose from a list of space types avail-
able in the current view and color schemes that have already been established within the
model. From the Space Type drop-down list, select Rooms, and from the Color Scheme
drop-down list, choose Name and click OK.
The color scheme will automatically generate a legend based on your room names and
color the rooms on the plan.
Figure 20.2
Choose space type and Color
scheme after you place the
legend in a view.
If you already created a color scheme that you wanted to use in this view, it would be
a simple matter of selecting it from this list and clicking OK, and the legend and view
would be complete. The default project template contains a few simple color schemes
from which you can choose when you place your first legend. You started with a basic
one that automatically assigns a color for each unique room name in the project; however,
this type of presentation is not usually that useful.
In the subsequent steps of the exercise, you will create different color schemes to further
explore more complex methods of presentation.
9. After the legend is placed, you can then alter its properties or choose a different color
scheme. Select the legend, and in the Modify | Color Fill Legends context menu, click the
Edit Scheme button.
This opens the aptly named Edit Color Scheme dialog box (Figure 20.3). This dialog box
allows you add, rename, or delete color schemes on the left side and define the graphic
properties and attributes of these schemes on the right.
A drop-down list labeled Color at the top of the Scheme Definition area appears. This
is the property by which the color scheme is being defined. It is currently assigned to
color the plan according to room name. Each unique room name in the project is
automatically generating its own color for the legend.
c20.indd 825 5/3/2014 11:59:57 AM