
Page 81 - Draft 2023 2024 CDL Manual w Modernization Info
P. 81
SECTION 10: SCHOOL. BUSES
• Is the bus in the path of a sighted tornado or • Lead students upwind of the bus at least 300 • Protect the scene. Set out emergency warning
rising waters? feet if there is a risk from spilled hazardous devices as necessary and appropriate.
• Are there downed power lines? materials. • Prepare information for emergency responders.
• Would removing students expose them to • If the bus is in the direct path of a sighted
tornado and evacuation is ordered, escort stu
speeding traffic, severe weather, or a danger dents to a nearby ditch or culvert if shelter in 10.4 - Railroad-highway
ous environment such as downed power lines? a building is not readily available, and direct Crossings
• Would moving students complicate injuries them to lie face down, hands covering their
such as neck and back injuries and fractures? head. They should be far enough away so the 10.4.1 -Types of Crossings
bus cannot topple on them. Avoid areas that
• Is there a hazardous spill involved? Some are subject to flash floods. Passive Crossings. This type of crossing does
times, it may be safer to remain on the bus not have any type of traffic control device. You
and not come in contact with the material. General Procedures. Determine if evacuation must stop at these crossings and follow proper
Mandatory Evacuations. The driver must is in the best interest of safety. procedures. However, the decision to proceed
rests entirely in your hands. Passive crossings
evacuate the bus when: • Determine the best type of evacuation: require you to recognize the crossing, search for
• The bus is on fire or there is a threat of a fire. » Front, rear or side door evacuation, or some any train using the tracks and decide if there
combination of doors.
• The bus is stalled on or adjacent to a railroad » Roof or window evacuation. is sufficient clear space to cross safely. Passive
crossings have yellow circular advance warning
highway crossing. • Secure the bus by: signs, pavement markings and crossbucks to
• The position of the bus may change and in » Placing transmission in Park, or if there is assist you in recognizing a crossing.
crease the danger. no shift point, in Neutral. Active Crossings. This type of crossing has a
• There is an imminent danger of collision. » Setting parking brakes. traffic control device installed at the crossing to
» Shutting off the engine.
• There is a need to quickly evacuate because » Removing ignition key. regulate traffic at the crossing. These active de
vices include flashing red lights, with or without
of a hazardous materials spill. » Activating hazard-warning lights. bells and flashing red lights with bells and gates.
• If time allows, notify dispatch office of evacu
10.3.2 - Evacuation Procedures ation location, conditions, and type of assis 10.4.2 -Warning Signs and Devices
Be Prepared and Plan Ahead. When possible, tance needed.
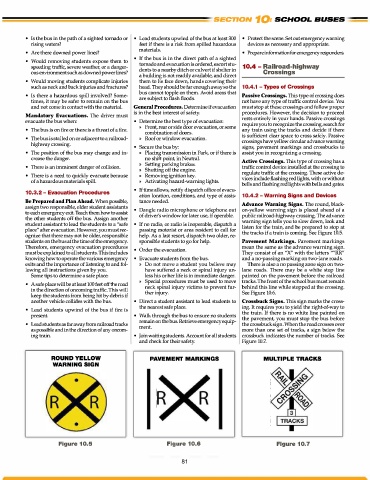
assign two responsible, older student assistants • Dangle radio microphone or telephone out Advance Warning Signs. The round, black
on-yellow warning sign is placed ahead of a
to each emergency exit. Teach them how to assist
the other students off the bus. Assign another of driver's window for later use, if operable. public railroad-highway crossing. The advance
warning sign tells you to slow down, look and
student assistant to lead the students to a "safe • If no radio, or radio is inoperable, dispatch a
place" after evacuation. However, you must rec passing motorist or area resident to call for listen for the train, and be prepared to stop at
the tracks if a train is coming. See Figure 10.5.
ognize that there may not be older, responsible help. As a last resort, dispatch two older, re
students on the bus at the time of the emergency. sponsible students to go for help. Pavement Markings. Pavement markings
Therefore, emergency evacuation procedures • Order the evacuation. mean the same as the advance warning sign.
must be explained to all students. This includes They consist of an "X" with the letters ""RR"
knowing how to operate the various emergency • Evacuate students from the bus. and a no-passing marking on two-lane roads.
exits and the importance of listening to and fol » Do not move a student you believe may There is also a no passing zone sign on two
lowing all instructions given by you. have suffered a neck or spinal injury un lane roads. There may be a white stop line
Some tips to determine a safe place: less his or her life is in immediate danger. painted on the pavement before the railroad
• A safe place will be at least 100 feet off the road » Special procedures must be used to move tracks. The front of the school bus must remain
neck spinal injury victims to prevent fur
in the direction of oncoming traffic. This will ther injury. behind this line while stopped at the crossing.
See Figure 10.6.
keep the students from being hit by debris if
another vehicle collides with the bus. • Direct a student assistant to lead students to Crossbuck Signs. This sign marks the cross
• Lead students upwind of the bus if fire is the nearest safe place. ing. It requires you to yield the right-of-way to
the train. If there is no white line painted on
present. • Walk through the bus to ensure no students the pavement, you must stop the bus before
• Lead students as far away from railroad tracks remain on the bus. Retrieve emergency equip the crossbuck sign. When the road crosses over
ment.
as possible and in the direction of any oncom more than one set of tracks, a sign below the
ing train. • Join waiting students. Account for all students crossbuck indicates the number of tracks. See
and check for their safety. Figure 10.7.
ROUND YELLOW PAVEMENT MARKINGS MULTIPLE TRACKS
WARNING SIGN
Figure 10.5 Figure 10.6 Figure 10.7
81