
Page 17 - Photoshop for Lightroom Users – Scott Kelby 2nd Edition
P. 17
Layers & Type: How Layers Work
If you laid an 8x10" photo on a table, then took a 4x6" photo and laid it on top, you could move the 4x6 around, reposition it on top of the original photo, or
you could even cut a hole in that 4x6 and see through that part of it. If you changed your mind, you could take that smaller photo away, so you’d just be left
with the original 8x10. Well, that’s how layers work in Photoshop. That 8x10" photo is your “Background layer” (that’s its official name), and you can add
stuff on top of it (like other photos), move them around, make parts of them transparent, or remove them altogether, all without messing up your original
image. But, it’s not just photos you can stack on top of your background photo—you can add type (on its own layer), shapes, paint strokes, and more.
Step One:
Let’s do a quick, easy project, so you’ll have a better idea of how layers work, and then we’ll do another project to help you start using layers like a pro.
Start in Lightroom by clicking on a photo, pressing Command-E (PC: Ctrl-E), and the image will open in Photoshop (if it’s a RAW photo; if it’s a JPEG
or TIFF, choose Edit a Copy with Lightroom Adjustments in the Edit Photo with Adobe Photoshop dialog). When the image opens in Photoshop, you can
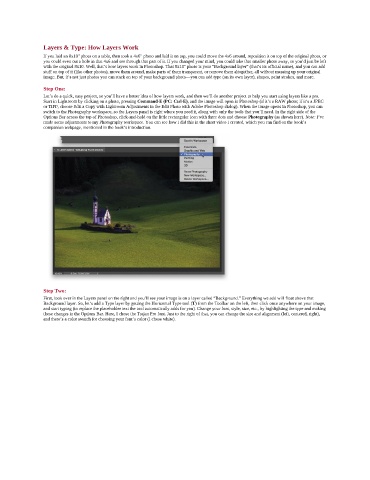
switch to the Photography workspace, so the Layers panel is right where you need it, along with only the tools that you’ll need. In the right side of the
Options Bar across the top of Photoshop, click-and-hold on the little rectangular icon with three dots and choose Photography (as shown here). Note: I’ve
made some adjustments to my Photography workspace. You can see how I did this in the short video I created, which you can find on the book’s
companion webpage, mentioned in the book’s introduction.
Step Two:
First, look over in the Layers panel on the right and you’ll see your image is on a layer called “Background.” Everything we add will float above that
Background layer. So, let’s add a Type layer by getting the Horizontal Type tool (T) from the Toolbar on the left, then click once anywhere on your image,
and start typing (to replace the placeholder text the tool automatically adds for you). Change your font, style, size, etc., by highlighting the type and making
these changes in the Options Bar. Here, I chose the Trajan Pro font. Just to the right of that, you can change the size and alignment (left, centered, right),
and there’s a color swatch for choosing your font’s color (I chose white).