
Page 177 - Photoshop for Lightroom Users – Scott Kelby 2nd Edition
P. 177
Step Two:
Click on the black-and-white portrait of the guy with the tattoo, press Command-A (PC: Ctrl-A) to select it, and then press Command-C (PC: Ctrl-C) to
Copy it into memory. Switch over to the marine and flag image, and then press Command-V (PC: Ctrl-V) to Paste it onto its own layer in this document.
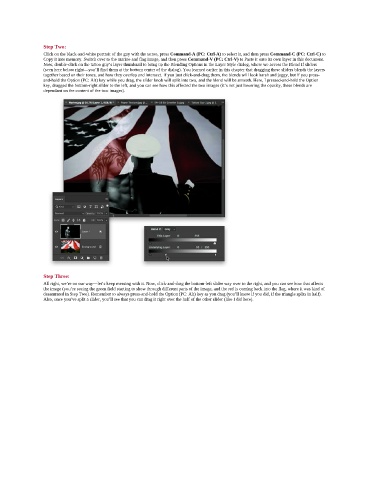
Now, double-click on the tattoo guy’s layer thumbnail to bring up the Blending Options in the Layer Style dialog, where we access the Blend If sliders
(seen here below right—you’ll find them at the bottom center of the dialog). You learned earlier in this chapter that dragging these sliders blends the layers
together based on their tones, and how they overlap and intersect. If you just click-and-drag them, the blends will look harsh and jaggy, but if you press-
and-hold the Option (PC: Alt) key while you drag, the slider knob will split into two, and the blend will be smooth. Here, I pressed-and-held the Option
key, dragged the bottom-right slider to the left, and you can see how this affected the two images (it’s not just lowering the opacity, these blends are
dependant on the content of the two images).
Step Three:
All right, we’re on our way—let’s keep messing with it. Now, click-and-drag the bottom-left slider way over to the right, and you can see how that affects
the image (you’re seeing the green field starting to show through different parts of the image, and the red is coming back into the flag, where it was kind of
desaturated in Step Two). Remember to always press-and-hold the Option (PC: Alt) key as you drag (you’ll know if you did, if the triangle splits in half).
Also, once you’ve split a slider, you’ll see that you can drag it right over the half of the other slider (like I did here).