
Page 174 - Photoshop for Lightroom Users – Scott Kelby 2nd Edition
P. 174
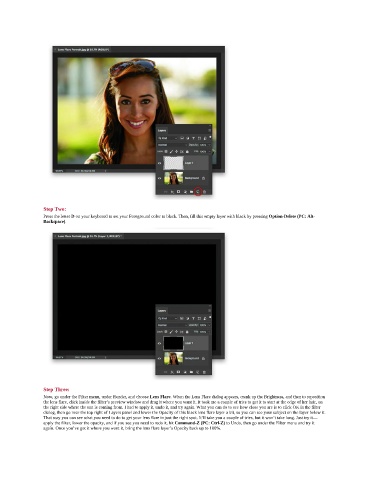
Step Two:
               Press the letter D on your keyboard to set your Foreground color to black. Then, fill this empty layer with black by pressing Option-Delete (PC: Alt-
               Backspace).


               Step Three:
               Now, go under the Filter menu, under Render, and choose Lens Flare. When the Lens Flare dialog appears, crank up the Brightness, and then to reposition
               the lens flare, click inside the filter’s preview window and drag it where you want it. It took me a couple of tries to get it to start at the edge of her hair, on
               the right side where the sun is coming from. I had to apply it, undo it, and try again. What you can do to see how close you are is to click OK in the filter
               dialog, then go near the top right of Layers panel and lower the Opacity of this black lens flare layer a bit, so you can see your subject on the layer below it.
               That way you can see what you need to do to get your lens flare in just the right spot. It’ll take you a couple of tries, but it won’t take long. Just try it—
               apply the filter, lower the opacity, and if you see you need to redo it, hit Command-Z (PC: Ctrl-Z) to Undo, then go under the Filter menu and try it
               again. Once you’ve got it where you want it, bring the lens flare layer’s Opacity back up to 100%.