
Page 84 - Photoshop for Lightroom Users – Scott Kelby 2nd Edition
P. 84
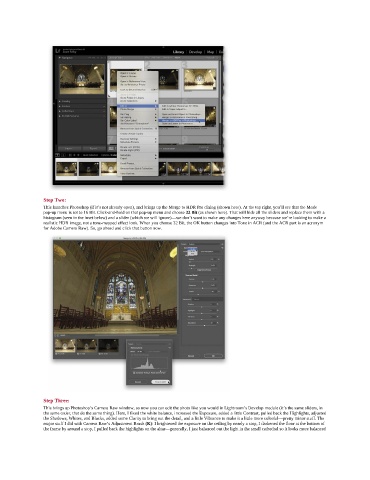
Step Two:
               This launches Photoshop (if it’s not already open), and brings up the Merge to HDR Pro dialog (shown here). At the top right, you’ll see that the Mode
               pop-up menu is set to 16 Bit. Click-and-hold on that pop-up menu and choose 32 Bit (as shown here). That will hide all the sliders and replace them with a
               histogram (seen in the inset below) and a slider (which we will ignore)—we don’t want to make any changes here anyway because we’re looking to make a
               realistic HDR image, not a tone-mapped effect look. When you choose 32 Bit, the OK button changes into Tone in ACR (and the ACR part is an acronym
               for Adobe Camera Raw). So, go ahead and click that button now.


               Step Three:
               This brings up Photoshop’s Camera Raw window, so now you can edit the photo like you would in Lightroom’s Develop module (it’s the same sliders, in
               the same order, that do the same thing). Here, I fixed the white balance, increased the Exposure, added a little Contrast, pulled back the Highlights, adjusted
               the Shadows, Whites, and Blacks, added some Clarity to bring out the detail, and a little Vibrance to make it a little more colorful—pretty minor stuff. The
               major stuff I did with Camera Raw’s Adjustment Brush (K): I brightened the exposure on the ceiling by nearly a stop, I darkened the floor at the bottom of
               the frame by around a stop, I pulled back the highlights on the altar—generally, I just balanced out the light in the small cathedral so it looks more balanced