
Page 88 - Photoshop for Lightroom Users – Scott Kelby 2nd Edition
P. 88
Tip: How To Handle Group Shots
If there’s more than one person in the photo you’re retouching, Liquify automatically recognizes that, and you can choose which face to adjust by choosing
it from the Select Face pop-up menu at the top of the Face-Aware Liquify section. You’ll see each face listed as Face #1, Face #2, and so on.
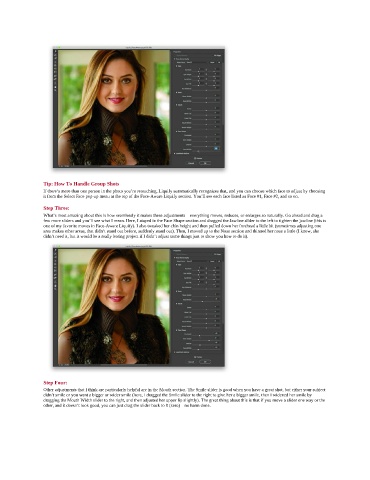
Step Three:
What’s most amazing about this is how seamlessly it makes these adjustments—everything moves, reduces, or enlarges so naturally. Go ahead and drag a
few more sliders and you’ll see what I mean. Here, I stayed in the Face Shape section and dragged the Jawline slider to the left to tighten the jawline (this is
one of my favorite moves in Face-Aware Liquify). I also tweaked her chin height and then pulled down her forehead a little bit (sometimes adjusting one
area makes other areas, that didn’t stand out before, suddenly stand out). Then, I moved up to the Nose section and thinned her nose a little (I know, she
didn’t need it, but it would be a really boring project if I didn’t adjust some things just to show you how to do it).
Step Four:
Other adjustments that I think are particularly helpful are in the Mouth section. The Smile slider is good when you have a great shot, but either your subject
didn’t smile or you want a bigger or wider smile (here, I dragged the Smile slider to the right to give her a bigger smile, then I widened her smile by
dragging the Mouth Width slider to the right, and then adjusted her upper lip slightly). The great thing about this is that if you move a slider one way or the
other, and it doesn’t look good, you can just drag the slider back to 0 (zero)—no harm done.