
Page 90 - Photoshop for Lightroom Users – Scott Kelby 2nd Edition
P. 90
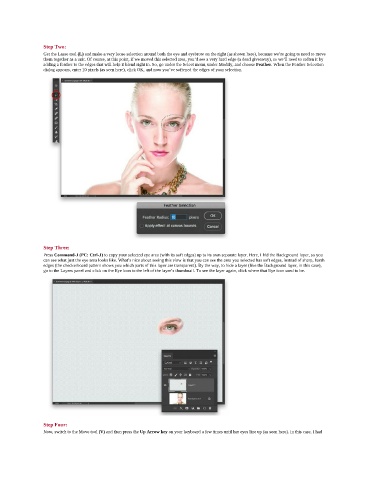
Step Two:
               Get the Lasso tool (L) and make a very loose selection around both the eye and eyebrow on the right (as shown here), because we’re going to need to move
               them together as a unit. Of course, at this point, if we moved this selected area, you’d see a very hard edge (a dead giveaway), so we’ll need to soften it by
               adding a feather to the edges that will help it blend right in. So, go under the Select menu, under Modify, and choose Feather. When the Feather Selection
               dialog appears, enter 10 pixels (as seen here), click OK, and now you’ve softened the edges of your selection.


               Step Three:
               Press Command-J (PC: Ctrl-J) to copy your selected eye area (with its soft edges) up to its own separate layer. Here, I hid the Background layer, so you
               can see what just the eye area looks like. What’s nice about seeing this view is that you can see the area you selected has soft edges, instead of sharp, harsh
               edges (the checkerboard pattern shows you which parts of this layer are transparent). By the way, to hide a layer (like the Background layer, in this case),
               go to the Layers panel and click on the Eye icon to the left of the layer’s thumbnail. To see the layer again, click where that Eye icon used to be.


               Step Four:
               Now, switch to the Move tool (V) and then press the Up Arrow key on your keyboard a few times until her eyes line up (as seen here). In this case, I had