
Page 95 - Photoshop for Lightroom Users – Scott Kelby 2nd Edition
P. 95
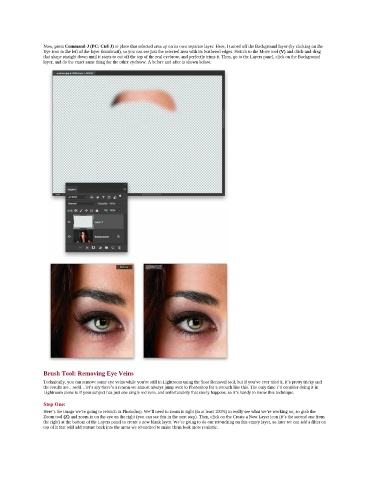
Now, press Command-J (PC: Ctrl-J) to place that selected area up on its own separate layer. Here, I turned off the Background layer (by clicking on the
               Eye icon to the left of the layer thumbnail), so you can see just the selected area with its feathered edges. Switch to the Move tool (V) and click-and-drag
               that shape straight down until it starts to cut off the top of the real eyebrow, and perfectly trims it. Then, go to the Layers panel, click on the Background
               layer, and do the exact same thing for the other eyebrow. A before and after is shown below.


               Brush Tool: Removing Eye Veins
               Technically, you can remove some eye veins while you’re still in Lightroom using the Spot Removal tool, but if you’ve ever tried it, it’s pretty tricky and
               the results are…well…let’s say there’s a reason we almost always jump over to Photoshop for a retouch like this. The only time I’d consider doing it in
               Lightroom alone is if your subject has just one single red vein, and unfortunately that rarely happens, so it’s handy to know this technique.
               Step One:
               Here’s the image we’re going to retouch in Photoshop. We’ll need to zoom in tight (to at least 100%) to really see what we’re working on, so grab the
               Zoom tool (Z) and zoom in on the eye on the right (you can see this in the next step). Then, click on the Create a New Layer icon (it’s the second one from
               the right) at the bottom of the Layers panel to create a new blank layer. We’re going to do our retouching on this empty layer, so later we can add a filter on
               top of it that will add texture back into the areas we retouched to make them look more realistic.