
Page 96 - Photoshop for Lightroom Users – Scott Kelby 2nd Edition
P. 96
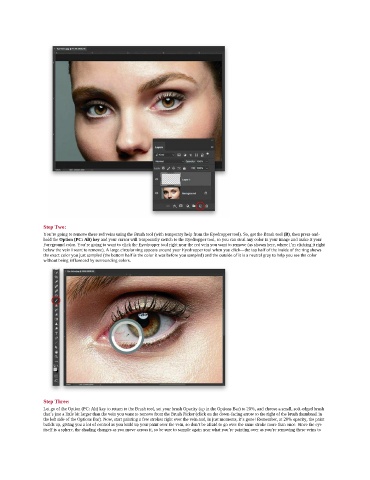
Step Two:
               You’re going to remove these red veins using the Brush tool (with temporary help from the Eyedropper tool). So, get the Brush tool (B), then press-and-
               hold the Option (PC: Alt) key and your cursor will temporarily switch to the Eyedropper tool, so you can steal any color in your image and make it your
               Foreground color. You’re going to want to click the Eyedropper tool right near the red vein you want to remove (as shown here, where I’m clicking it right
               below the vein I want to remove). A large circular ring appears around your Eyedropper tool when you click—the top half of the inside of the ring shows
               the exact color you just sampled (the bottom half is the color it was before you sampled) and the outside of it is a neutral gray to help you see the color
               without being influenced by surrounding colors.


               Step Three:
               Let go of the Option (PC: Alt) key to return to the Brush tool, set your brush Opacity (up in the Options Bar) to 20%, and choose a small, soft-edged brush
               that’s just a little bit larger than the vein you want to remove from the Brush Picker (click on the down-facing arrow to the right of the brush thumbnail in
               the left side of the Options Bar). Now, start painting a few strokes right over the vein and, in just moments, it’s gone! Remember, at 20% opacity, the paint
               builds up, giving you a lot of control as you build up your paint over the vein, so don’t be afraid to go over the same stroke more than once. Since the eye
               itself is a sphere, the shading changes as you move across it, so be sure to sample again near what you’re painting over as you’re removing these veins to