
Page 38 - QR KLINDEX EXPANDER850AT-RXt
P. 38
ELECTRICAL CONNECTIONS
6 Electrical connections d NO
Cutting or altering the plug and using
l NOTICE adapters. Only a qualified and authorised
Before performing any operation on the electrician can replace the plug, if neces-
appliance, make sure that the main dial is sary. Only a qualified electrician can re-
set to “OFF”. place a burned, cut or damaged electrical
cable.
6.1 Connecting to the power socket l WARNINGS
l WARNINGS – Before moving the appliance to the
work area, make sure that the handle
– Before connecting the appliance to the grip and caster wheel are both inserted
mains power network, make sure that and locked.
the voltage and frequency are suitable
for appliance operation as indicated in – The planetary must be fully raised from
the section "Technical characteristics" the floor: act on the joystick to raise/
on page 49. lower the planetary.
– The power socket must be earthed.
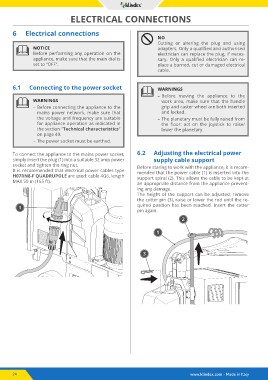
To connect the appliance to the mains power socket, 6.2 Adjusting the electrical power
simply insert the plug (1) into a suitable 32 amp power supply cable support
socket and tighten the ring nut.
It is recommended that electrical power cables type Before staring to work with the appliance, it is recom-
H07RN8-F QUADRUPOLE are used: cable 4G6, length mended that the power cable (1) is inserted into the
MAX 50 m (165 ft). support spiral (2). This allows the cable to be kept at
an appropriate distance from the appliance prevent-
1 ing any damage.
The height of the support can be adjusted; remove
the cotter pin (3), raise or lower the rod until the re-
quired position has been reached. Insert the cotter
pin again.
2
1
3
24 www.klindex.com - Made in Italy