
Page 825 - Kitab3DsMax
P. 825
Chapter 31: Painting in the Viewpoint Canvas and Rendering Surface Maps
If the Paint brush is selected, you can immediately switch to the Erase brush by holding down the Shift key.
Holding down the Ctrl key lets you click to select a different color from the current texture. Pressing the
Spacebar causes a straight line to be drawn from the last painted location to the current cursor location. The
Spacebar shortcut also works with the Eraser brush.
With any of the standard brushes, you can hold down the Ctrl+Shift keys to drag and change the brush
radius. The Alt+Shift keys change the brush Opacity, and the Ctrl+Alt keys change the brush’s Hardness
value.
Clicking the Color swatch opens a Color Selector dialog box where you can choose a new color. You also
can load a custom color palette using the Open Color Palette button or quickly switch between black and
white colors, which is helpful for painting value maps.
At any time while painting, you are free in the viewport to rotate the model around to paint in a different
location.
If you don’t like the results after the painted texture has been applied to the object, click the Undo/Redo
button to remove the last set of changes. Clicking the Undo/Redo button again reapplies the recent changes.
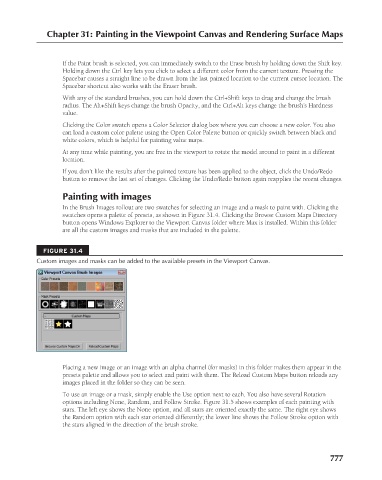
Painting with images
In the Brush Images rollout are two swatches for selecting an image and a mask to paint with. Clicking the
swatches opens a palette of presets, as shown in Figure 31.4. Clicking the Browse Custom Maps Directory
button opens Windows Explorer to the Viewport Canvas folder where Max is installed. Within this folder
are all the custom images and masks that are included in the palette.
FIGURE 31.4
Custom images and masks can be added to the available presets in the Viewport Canvas.
Placing a new image or an image with an alpha channel (for masks) in this folder makes them appear in the
presets palette and allows you to select and paint with them. The Reload Custom Maps button reloads any
images placed in the folder so they can be seen.
To use an image or a mask, simply enable the Use option next to each. You also have several Rotation
options including None, Random, and Follow Stroke. Figure 31.5 shows examples of each painting with
stars. The left eye shows the None option, and all stars are oriented exactly the same. The right eye shows
the Random option with each star oriented differently; the lower line shows the Follow Stroke option with
the stars aligned in the direction of the brush stroke.
777