
Page 830 - Kitab3DsMax
P. 830
Part VII: Advanced Materials
The Load/Save Settings rollout includes buttons for saving and loading the Viewpoint Canvas settings. Settings
are saved using a simple text file. There is also a button for saving the current settings as the default.
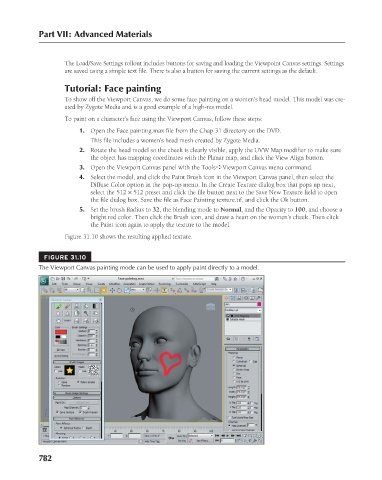
Tutorial: Face painting
To show off the Viewport Canvas, we do some face painting on a women’s head model. This model was cre-
ated by Zygote Media and is a good example of a high-res model.
To paint on a character’s face using the Viewport Canvas, follow these steps:
1. Open the Face painting.max file from the Chap 31 directory on the DVD.
This file includes a women’s head mesh created by Zygote Media.
2. Rotate the head model so the cheek is clearly visible, apply the UVW Map modifier to make sure
the object has mapping coordinates with the Planar map, and click the View Align button.
3. Open the Viewport Canvas panel with the Tools ➪ Viewport Canvas menu command.
4. Select the model, and click the Paint Brush icon in the Viewport Canvas panel, then select the
Diffuse Color option in the pop-up menu. In the Create Texture dialog box that pops up next,
select the 512 × 512 preset and click the file button next to the Save New Texture field to open
the file dialog box. Save the file as Face Painting texture.tif, and click the Ok button.
5. Set the brush Radius to 32, the blending mode to Normal, and the Opacity to 100, and choose a
bright red color. Then click the Brush icon, and draw a heart on the women’s cheek. Then click
the Paint icon again to apply the texture to the model.
Figure 31.10 shows the resulting applied texture.
FIGURE 31.10
The Viewport Canvas painting mode can be used to apply paint directly to a model.
782