
Page 831 - Kitab3DsMax
P. 831
Chapter 31: Painting in the Viewpoint Canvas and Rendering Surface Maps
Using Vertex Colors
Another similar feature to the Viewport Canvas is the Vertex Paint modifier. This modifier lets you apply
colors to a model without the weight of a texture. When creating models for games, the size of the texture
map can be prohibitive. I mean, what model that weighs in at 16KB or less wants to carry around a 2MB
texture map? The solution that much of the gaming world relies on is to apply a single color to a vertex.
Having each vertex remember its color (or even several colors) requires very little additional information for
the mesh and can create some good shading. Colors are then interpolated across the face of the polygon
between two different colors on adjacent vertices.
The results aren’t as clean and detailed as texture maps, but for their size, vertex colors are worth the price.
Assigning vertex colors
Vertex colors can be assigned in the Surface Properties rollout for Editable Mesh and Editable Patch objects,
and in the Vertex and Polygon Properties rollouts for Editable Poly objects. They also can be assigned in
Face, Polygon, and Element subobject modes using a little rollout section called Edit Vertex Colors. Within
this section are two color swatches for selecting Color and Illumination values. The Alpha value sets the
alpha transparency value for the vertex.
Painting vertices with the Vertex Paint modifier
Another, more interactive way to color vertices is with the Vertex Paint modifier. This modifier lets you
paint on an object by specifying a color for each vertex. If adjacent vertices have different colors assigned, a
gradient is created across the face. The benefit of this coloring option is that it is very efficient and requires
almost no memory.
The Vertex Paint modifier lets you specify a color and paint directly on the surface of an object by painting
the vertices. The color is applied with a paintbrush-shaped cursor. The modifier can be applied multiple
times to an object, giving you the ability to blend several layers of vertex paints together. You can find this
modifier in the Modifiers ➪ Mesh Editing submenu.
Note
After the Vertex Paint modifier has been applied to an object, the Paintbox automatically reappears whenever the
object is reselected. n
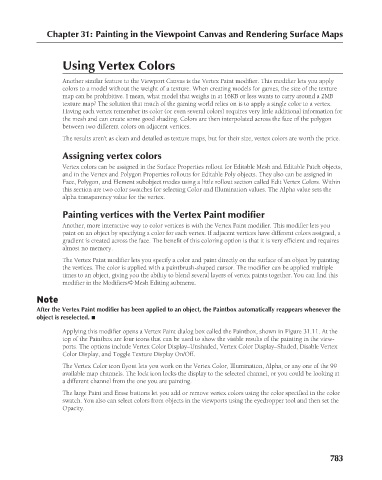
Applying this modifier opens a Vertex Paint dialog box called the Paintbox, shown in Figure 31.11. At the
top of the Paintbox are four icons that can be used to show the visible results of the painting in the view-
ports. The options include Vertex Color Display–Unshaded, Vertex Color Display–Shaded, Disable Vertex
Color Display, and Toggle Texture Display On/Off.
The Vertex Color icon flyout lets you work on the Vertex Color, Illumination, Alpha, or any one of the 99
available map channels. The lock icon locks the display to the selected channel, or you could be looking at
a different channel from the one you are painting.
The large Paint and Erase buttons let you add or remove vertex colors using the color specified in the color
swatch. You also can select colors from objects in the viewports using the eyedropper tool and then set the
Opacity.
783