
Page 855 - Kitab3DsMax
P. 855
Chapter 32: Unwrapping UVs and Mapping Textures
Tutorial: Spline mapping a snake
Spline mapping works well for objects like tentacles, arms, and ropes that have strong bends that cause
mapping to be distorted. It also works well for simple snakes coiled and ready to strike.
To add a texture map to a snake so it follows its length, follow these steps:
1. Open the Snake.max file from the Chap 32 directory on the DVD. This object was created using
the Sweep modifier and includes a lot of polygons. Before converting to an Editable Poly and
forming the head, I cloned the path used to create the snake, so a spline that runs along the
snake’s midline is also in the scene.
2. Select the Modifiers ➪ UV Coordinates ➪ Unwrap UVW menu to apply the modifier to the snake.
Notice how the checkerboard texture is stretched along the snake’s neck and head.
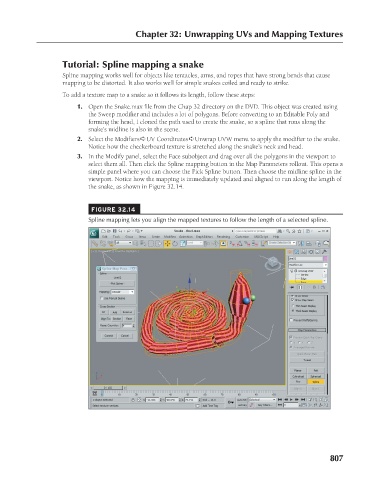
3. In the Modify panel, select the Face subobject and drag over all the polygons in the viewport to
select them all. Then click the Spline mapping button in the Map Parameters rollout. This opens a
simple panel where you can choose the Pick Spline button. Then choose the midline spline in the
viewport. Notice how the mapping is immediately updated and aligned to run along the length of
the snake, as shown in Figure 32.14.
FIGURE 32.14
Spline mapping lets you align the mapped textures to follow the length of a selected spline.
807