
Page 559 - Workshop Manual - Aumark (BJ1051)
P. 559
11-5
Fuel-Fuel tank
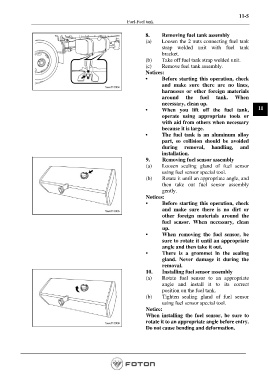
8. Removing fuel tank assembly
(a) Loosen the 2 nuts connecting fuel tank
strap welded unit with fuel tank
bracket.
(b) Take off fuel tank strap welded unit.
(c) Remove fuel tank assembly.
Notices:
• Before starting this operation, check
and make sure there are no lines,
harnesses or other foreign materials
around the fuel tank. When
necessary, clean up.
• When you lift off the fuel tank, 11
operate using appropriate tools or
with aid from others when necessary
because it is large.
• The fuel tank is an aluminum alloy
part, so collision should be avoided
during removal, handling, and
installation.
9. Removing fuel sensor assembly
(a) Loosen sealing gland of fuel sensor
using fuel sensor special tool.
(b) Rotate it until an appropriate angle, and
then take out fuel sensor assembly
gently.
Notices:
• Before starting this operation, check
and make sure there is no dirt or
other foreign materials around the
fuel sensor. When necessary, clean
up.
• When removing the fuel sensor, be
sure to rotate it until an appropriate
angle and then take it out.
• There is a grommet in the sealing
gland. Never damage it during the
removal.
10. Installing fuel sensor assembly
(a) Rotate fuel sensor to an appropriate
angle and install it to its correct
position on the fuel tank.
(b) Tighten sealing gland of fuel sensor
using fuel sensor special tool.
Notice:
When installing the fuel sensor, be sure to
rotate it to an appropriate angle before entry.
Do not cause bending and deformation.
Page 559