
Page 15 - LAWTRUST eSignatures User Manual
P. 15
5. Add documents Signers
Once a document has been uploaded, all the individuals that need to authorize the document (signers)
will need to be added.
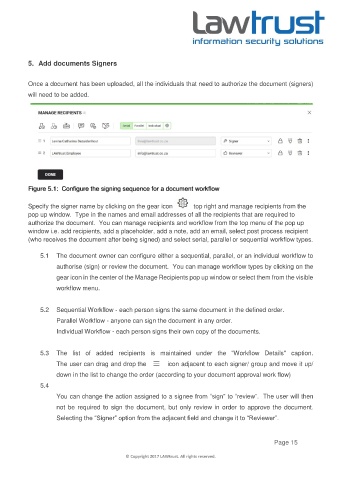
Figure 5.1: Configure the signing sequence for a document workflow
Specify the signer name by clicking on the gear icon top right and manage recipients from the
pop up window. Type in the names and email addresses of all the recipients that are required to
authorize the document. You can manage recipients and workflow from the top menu of the pop up
window i.e. add recipients, add a placeholder, add a note, add an email, select post process recipient
(who receives the document after being signed) and select serial, parallel or sequential workflow types.
5.1 The document owner can configure either a sequential, parallel, or an individual workflow to
authorise (sign) or review the document. You can manage workflow types by clicking on the
gear icon in the center of the Manage Recipients pop up window or select them from the visible
workflow menu.
5.2 Sequential Workflow - each person signs the same document in the defined order.
Parallel Workflow - anyone can sign the document in any order.
Individual Workflow - each person signs their own copy of the documents.
5.3 The list of added recipients is maintained under the "Workflow Details" caption.
The user can drag and drop the icon adjacent to each signer/ group and move it up/
down in the list to change the order (according to your document approval work flow)
5.4
You can change the action assigned to a signee from “sign” to “review”. The user will then
not be required to sign the document, but only review in order to approve the document.
Selecting the “Signer” option from the adjacent field and change it to “Reviewer”.
Page 15
© Copyright 2017 LAWtrust. All rights reserved.