
Page 1268 - 2006 HARLEY FLSTCI SERVICE MANUAL
P. 1268
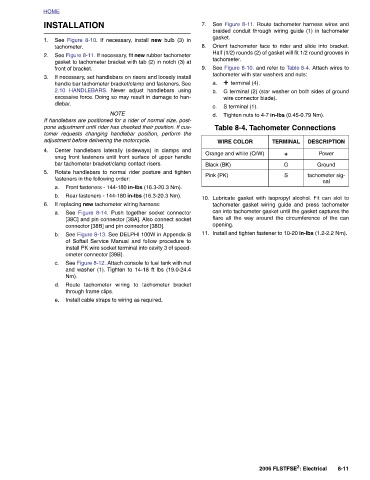
braided conduit through wiring guide (1) in tachometer
                     Orient tachometer face to rider and slide into bracket.
                       Half (1/2) rounds (2) of gasket will fit 1/2 round grooves in
              See Figure 8-11. Route tachometer harness wires and
                                                   DESCRIPTION  Power  Ground  tachometer sig-  nal                                                      8-11


                              tachometer with star washers and nuts: See Figure 8-10. and refer to Table 8-4. Attach wires to  G terminal (2) (star washer on both sides of ground wire connector blade).   Tighten nuts to 4-7 in-lbs (0.45-0.79 Nm). Table 8-4. Tachometer Connections  TERMINAL  +  G  S Lubricate gasket with isopropyl alcohol. Fit can slot to tachometer gasket wiring guide and press tachometer can into tachometer gasket until the gasket captures the flare all the way around the circumference of the can Install and tighten fastener to 10-20 in-lbs (1.2-2.2 Nm).  2006 FLSTFSE 2 : Electrical


                                 gasket.  tachometer.  + terminal (4).   S terminal (1).  WIRE COLOR  Orange and white (O/W)  opening.


              7.     8.    9.   a.   b.   c.   d.         Black (BK)  Pink (PK)  10.  11.
                              If necessary, set handlebars on risers and loosely install
                                  Never adjust handlebars using handle bar tachometer bracket/clamp and fasteners. See excessive force. Doing so may result in damage to han-  NOTE If handlebars are positioned for a rider of normal size, post- pone adjustment until rider has checked their position. If cus- tomer requests changing handlebar position, perform the Center handlebars laterally (sideways) in clamps and snug front fasteners until front surface of upper handle Rotate handlebars to normal rider posture and tighten Front fasteners - 144-180 in-lbs (16.3-20.3 Nm). Rear fasteners - 144-180 in-lbs (16.3-20.3 Nm). a. See  Figure 8-14.  Push together socket conne
                          gasket to tachometer bracket with tab (2) in notch (3) at
                   See  Figure 8-10.  If necessary, install  new  bulb (3) in
                       See Figure 8-11. If necessary, fit new rubber tachometer


              INSTALLATION  tachometer.  front of bracket.  2.10 HANDLEBARS.   dlebar.  adjustment before delivering the motorcycle.   bar tachometer bracket/clamp contact risers.  fasteners in the following order:  If replacing new tachometer wiring harness:   ometer connector [39B}.  See  Nm).  through frame clips. e. Install cable straps to wiring as required.


          HOME     1.  2.     3.                     4.     5.   a.   b.   6.   b.       c.    d.