
Page 946 - 2006 HARLEY FLSTCI SERVICE MANUAL
P. 946
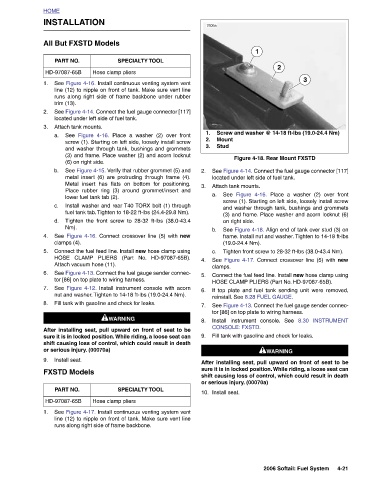
Figure 4-18. Rear Mount FXSTD            HOSE CLAMP PLIERS (Part No. HD-97087-65B).   1WARNING 1WARNING After installing seat, pull upward on front of seat to be sure it is in locked position. While riding, a loose seat can shift causing loss of control, which could result in death
                                 3                                     Place a washer (2) over front            8.30 INSTRUMENT                                  4-21 2006 Softail: Fuel System


                             2                    Screw and washer @ 14-18 ft-lbs (19.0-24.4 Nm)  See Figure 4-14. Connect the fuel gauge connector [117]  screw (1). Starting on left side, loosely install screw and washer through tank, bushings and grommets (3) and frame. Place washer and acorn locknut (6) See Figure 4-18. Align end of tank over stud (3) on frame. Install nut and washer. Tighten to 14-18 ft-lbs Tighten front screw to 28-32 ft-lbs (38.0-43.4 Nm). See  Figure 4-17.  Connect crossover line (5) with new Connect the fuel feed line. Install new hose clamp using If top plate and fuel tank sending unit were removed, See Figure 4-13. Connect the fuel gauge


                        1                                        located under left side of fuel tank.   Figure 4-16.   (19.0-24.4 Nm).  reinstall. See 8.28 FUEL GAUGE.   tor [86] on top plate to wiring harness. Install instrument console. See  Fill tank with gasoline and check for leaks.


                                                     Mount  Stud    Attach tank mounts.  a. See   on right side.  clamps.  CONSOLE: FXSTD.  or serious injury. (00070a)  Install seat.

               7605a                              1.  2.  3.                      b.      c.
                                                               2.   3.                      4.   5.   6.   7.   8.   9.                 10.


                           SPECIALTY TOOL  Hose clamp pliers See Figure 4-16. Install continuous venting system vent line (12) to nipple on front of tank. Make sure vent line runs along right side of frame backbone under rubber See Figure 4-14. Connect the fuel gauge connector [117]  Place a washer (2) over front screw (1). Starting on left side, loosely install screw and washer through tank, bushings and grommets (3) and frame. Place washer (2) and acorn locknut See Figure 4-15. Verify that rubber grommet (5) and metal insert (6) are protruding through frame (4). Metal insert has flats on bottom for positioning. Place rubber ring (3) around grommet/insert and Inst


              INSTALLATION  All But FXSTD Models  PART NO.  HD-97087-65B  trim (13).  located under left side of fuel tank.   Attach tank mounts.  Figure 4-16.  a. See   (6) on right side.  lower fuel tank tab (2).  Nm).  clamps (4).  Attach vacuum hose (11).  tor [86] on top plate to wiring harness.  Fill tank with gasoline and check for leaks.  or serious injury. (00070a)  Install seat.  FXSTD Models  PART NO.  HD-97087-65B  runs along right side of frame backbone.


          HOME                                                 b.         c.   d.
                                  1.       2.   3.                                  4.   5.      6.   7.   8.                9.                1.