
Page 374 - Installation Training Binder FIT1-3
P. 374
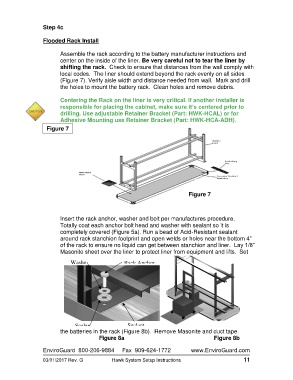
Step 4c

                   Flooded Rack Install

                          Assemble the rack according to the battery manufacturer instructions and
                          center on the inside of the liner. Be very careful not to tear the liner by
                          shifting the rack.  Check to ensure that distances from the wall comply with
                          local codes.  The liner should extend beyond the rack evenly on all sides
                          (Figure 7). Verify aisle width and distance needed from wall.  Mark and drill
                          the holes to mount the battery rack.  Clean holes and remove debris.

                          Centering the Rack on the liner is very critical. If another installer is
                          responsible for placing the cabinet, make sure it’s centered prior to
                          drilling. Use adjustable Retainer Bracket (Part: HWK-HCAL) or for
                          Adhesive Mounting use Retainer Bracket (Part: HWK-HCA-ADH).
                     Figure 7


                                                                                Figure 7


                          Insert the rack anchor, washer and bolt per manufactures procedure.
                          Totally coat each anchor bolt head and washer with sealant so it is
                          completely covered (Figure 5a). Run a bead of Acid-Resistant sealant
                          around rack stanchion footprint and open welds or holes near the bottom 4”
                          of the rack to ensure no liquid can get between stanchion and liner.  Lay 1/8”
                          Masonite sheet over the liner to protect liner from equipment and lifts.  Set

                               Washe                 Rack Anchor


                                Sealan                   Sealant
                          the batteries in the rack (Figure 8b).  Remove Masonite and duct tape.
                                                 Figure 8a                                                        Figure 8b

                   EnviroGuard  800-206-9884     Fax  909-624-1772               www.EnviroGuard.com

                   03/01/2017 Rev. G            Hawk System Setup Instructions                         11