
Page 234 - Womens Pavilion
P. 234
“Oil-Less” Scroll Medical Air
Appendix C: CO Transmitter
C.9.2 Transmitter Calibration • Locate the dark blue potentiometer, marked
“C” (lower potentiometer) and adjust the pot
The following procedure should be used to until the I2 reading on the main diagnostic
calibrate the transmitter. (See C.11 Accessories screen reads 890. Turning the adjusting screw
and Replacement Parts for calibration kit part counterclockwise will reduce the reading.
numbers) Turning it clockwise will raise the reading.
• Zero the transmitter prior to calibration, see • As this adjustment may aff ect the previously
C.9.1 for zeroing procedure. completed Zero Adjustment, it is necessary
to repeat both the zeroing procedure and
• Disconnect the zero gas cylinder from the calibration procedure once more to ensure the
transmitter and connect the air line from the transmitter is set properly.
20 ppm CO gas cylinder.
• After verifying that both Zero and Calibration
• Allow the calibration gas from the cylinder to adjustments are done correctly, reinstall the
fl ow through the sensor for approximately 3 cover on the transmitter.
minutes to stabilize the sensor.
• Reconnect the inlet air line from the dryer.
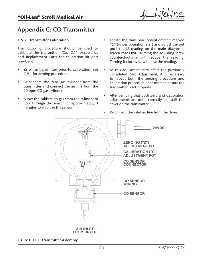
24VDC
ZEROING ("Z")
T ADJUSTMENT POT
TS
CALIBRATION ("C")
ADJUSTMENT POT
CO SENSOR
CONNECTOR
CO SENSOR
WIRING
CO SENSOR
AIR INLET
FROM DRYER
Figure C.1 CO Transmitter Assembly
C-3 4107 9000 69.06