
Page 286 - Womens Pavilion
P. 286
Oil-Less Claw Medical Vacuum
4.0 General Operation
4.4 Backup Vacuum Switch Set Point Adjusting Instructions
Adjustments
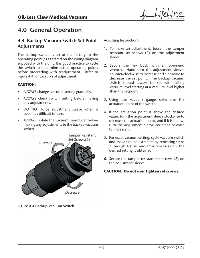
1. To make an adjustment, loosen the tamper
resistant set screws (2) on the adjustment
The backup switch is set at the factory to the
operating point(s) as stated on the wiring diagram sleeve.
supplied with the unit. It is good practice to cycle 2. Secure the hex body with an open-end
the switch to determine actual operating points wrench. Hand turn the adjustment sleeve:
before proceeding with readjustment. Refer to
Figure 4.4 for location of adjustment. counter-clockwise to increase and clockwise to
decrease the set point. The backup vacuum
switch should always be set with falling
CAUTION:
vacuum level starting at a vacuum level higher
• ALWAYS change vacuum setting gradually. than the setpoint.
• ALWAYS check switch setting before making 3. Using the vacuum gauge determine the
any adjustments. actuation point of the switch.
• DO NOT force adjustment sleeve when it
becomes diffi cult to turn. 4. If the actuation point is above the desired
value, turn the adjustment sleeve clockwise to
• ALWAYS isolate the vacuum transducer before decrease the actuation point, and if it is below,
making any adjustments to the backup vacuum turn the adjustment sleeve counter-clockwise
switch. to increase it.
Tamper Resistant
Set Screws(2) 5. For exact vacuum setting, cycle vacuum switch
Increase and make fi ne adjustments by repeating steps
2 through 4 (trial and error process) until the
desired setting is obtained.
6. Secure the tamper resistant set screws (2) on
the adjustment sleeve.
CAUTION: Do not over tighten set screws.
Decrease
Figure 4.4 Backup Vacuum Switch
4-5 4107 9000 95.04