
Page 1197 - Chief Architect Reference Manual
P. 1197
Chief Architect X10 Reference Manual
DXF Codes code for the material is included in the layer
name.
Each exported layer name can include a DXF
Code for the materials applied to objects on DXF Codes are specified for each material in
that layer. If a material has been specified for the Plan Materials dialog. See “Plan
an object and appears on its surface, the DXF Materials Dialog” on page 1027.
Export 360 Panorama
The Export 360 Panorama tool • Specify the Height and Width of the
creates a spherical panoramic image exported image file, in pixels.
that can be opened in various panorama • Check Limit Dimensions to Powers of
viewers. Select File> Export> Export 360 Two to restrict the Width and Height to
Panorama while a 3D view is active to values that are powers of two. When this
access this tool. is checked and an ineligible value is
For best results, position the camera as near entered, it will adjust up or down to the
as you can to the center of the scene before nearest power of two. Although not
exporting. required, this option is recommended for
best results in some panoramic image
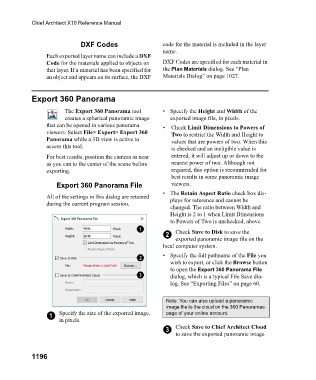
Export 360 Panorama File viewers.
• The Retain Aspect Ratio check box dis-
All of the settings in this dialog are retained plays for reference and cannot be
during the current program session.
changed. The ratio between Width and
Height is 2 to 1 when Limit Dimensions
to Powers of Two is unchecked, above.
2 Check Save to Disk to save the
exported panoramic image file on the
local computer system.
• Specify the full pathname of the File you
wish to export, or click the Browse button
to open the Export 360 Panorama File
dialog, which is a typical File Save dia-
log. See “Exporting Files” on page 60.
Note: You can also upload a panoramic
image file to the cloud on the 360 Panoramas
1 Specify the size of the exported image, page of your online account.
in pixels.
3 Check Save to Chief Architect Cloud
to save the exported panoramic image
1196