
Page 16 - Foaming Pods
P. 16
FOAMING PODS
Installation
Pod Assembly
Mounting the Pods to 4 x 4 and 4 x 6 Frames such as Gyro Wrap, Single Arch, Top Wheel,
etc.
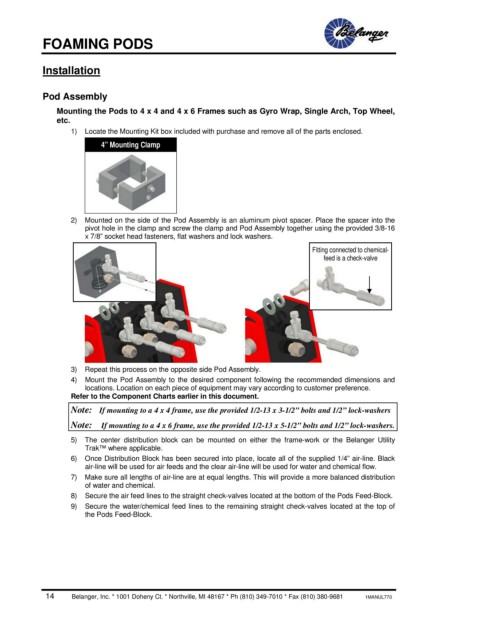
1) Locate the Mounting Kit box included with purchase and remove all of the parts enclosed.
4” Mounting Clamp
2) Mounted on the side of the Pod Assembly is an aluminum pivot spacer. Place the spacer into the
pivot hole in the clamp and screw the clamp and Pod Assembly together using the provided 3/8-16
x 7/8” socket head fasteners, flat washers and lock washers.
Fitting connected to chemical-
feed is a check-valve
3) Repeat this process on the opposite side Pod Assembly.
4) Mount the Pod Assembly to the desired component following the recommended dimensions and
locations. Location on each piece of equipment may vary according to customer preference.
Refer to the Component Charts earlier in this document.
Note: If mounting to a 4 x 4 frame, use the provided 1/2-13 x 3-1/2” bolts and 1/2” lock-washers
Note: If mounting to a 4 x 6 frame, use the provided 1/2-13 x 5-1/2” bolts and 1/2” lock-washers.
5) The center distribution block can be mounted on either the frame-work or the Belanger Utility
Trak™ where applicable.
6) Once Distribution Block has been secured into place, locate all of the supplied 1/4” air-line. Black
air-line will be used for air feeds and the clear air-line will be used for water and chemical flow.
7) Make sure all lengths of air-line are at equal lengths. This will provide a more balanced distribution
of water and chemical.
8) Secure the air feed lines to the straight check-valves located at the bottom of the Pods Feed-Block.
9) Secure the water/chemical feed lines to the remaining straight check-valves located at the top of
the Pods Feed-Block.
14 Belanger, Inc. * 1001 Doheny Ct. * Northville, MI 48167 * Ph (810) 349-7010 * Fax (810) 380-9681 1MANUL770